When you click on links to various merchants on this site and make a purchase, this can result in this site earning a commission. Affiliate programs and affiliations include, but are not limited to, the eBay Partner Network.
Thank you!
If you do not wish to have your item(s) delivered on data disc(s), I can provide them on a flash drive and other means as well. Just let me know if a disc does not work for you and we can discuss delivery by other methods.
COMBINING SHIPPING COSTS
Are you purchasing multiple items? I will: a) combine all invoices before payment and charge shipping equivalent to one item, or b) refund all shipping costs in excess of one item after payment.
jefffj store
All derivative (i.e. change in media; by compilation) work from this underlying U.S. Government public domain/public release data is COPYRIGHT © GOVPUBS
$3.00 first class shipping in U.S.
Includes the Adobe Acrobat Reader for reading and printing publications.
Numerous illustrations and matrices.
Contains the following key public domain (not copyrighted) U.S. Government publication(s) on one CD-ROM in both Microsoft PowerPoint and Adobe Acrobat PDF file formats:
TITLE: Physician Assistant Combat Life Saver Compilation, 682 pages (slides)
Compiled and edited by 2LT John C. Miller, PA-C
SLIDE TOPICS, SUBTOPICS and CONTENTS:
APPLY A DRESSING TO AN OPEN CHEST WOUND
INTRODUCTION
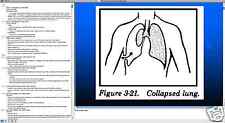
If an object punctures the chest wall, permitting air to enter between the chest wall and the lung, the lung collapses. Any degree of collapse, interferes with the body\'s ability to expand the lung and absorb oxygen. Even if one lung is collapsing, the other lung may be functioning, assuming that side of the chest is intact. The first aid procedure for a casualty with a penetrating chest wound is to prevent the lung from collapsing any more than it has already by placing an airtight seal over the wound.
APPLY A DRESSING TO AN OPEN CHEST WOUND
TASK
Apply a dressing to a casualty with an open chest wound.
CONDITIONS
Given a simulated casualty with an open chest wound and needed supplies.
STANDARD
Score a GO on the performance checklist.
CHECK FOR SIGNS AND SYMPTOMS OF AN OPEN CHEST WOUND
Obvious penetration of the chest wall by a bullet, knife blade, shrapnel, or other object.
Sucking sound coming from chest wound. (An open chest wound is often called a \"sucking chest wound.\")
Frothy blood from chest wound. (Bubbles of blood are caused by air going in and out of the wound.)
Blood coughed up.
Shortness of breath or other difficulty in breathing.
Chest not rising normally when the casualty inhales.
Pain in the shoulder or chest area which increases with breathing.CHECK FOR SIGNS AND SYMPTOMS OF AN OPEN CHEST WOUND
Bluish tint to lips, inside of mouth, fingertips, or nailbeds. (The color change is caused by the decreased amount of oxygen in the blood.)
Rapid and weak heartbeat.
When in doubt, treat the wound as an open chest wound.
LOCATE AND EXPOSE OPEN CHEST WOUND
Check for entry and exit wounds.
Expose the area around the open chest wound by removing, cutting, or tearing the clothing covering the wound.
If clothing is stuck to the wound, cut or tear around the stuck clothing rather than removing the stuck clothing.
Do not try to clean the wound or remove impaled objects.
If you are in a chemical environment, seal and dress the wound without exposing the wound, other than the exposure needed to seal the wound.LOCATE AND EXPOSE OPEN CHEST WOUND
Look for a pool of blood under the casualty\'s back and use your hand to feel for wounds.
If there is more than one open chest wound, treat the more serious (largest, heaviest bleeding) wound first.
SEAL AND DRESS THE OPEN CHEST WOUND
Since air can pass through a dressing, you must seal an open chest wound to stop air from entering the chest and collapsing the lung.
Open Field Dressing Wrapper
Tear open one end of the plastic wrapper of a field dressing.
Remove the inner packet.
Tear around the edges of the plastic wrapper until a flat surface is formed. Do not touch the inside surface of the plastic wrapper.
SEAL AND DRESS THE OPEN CHEST WOUND
Seal the Wound
Tell the casualty to completely exhale and hold his breath. If possible, the casualty should hold his breath until the sealing material has been secured. Having the casualty to exhale forces some of the air out of the chest wound.
If the casualty is unconscious or cannot hold his breath, place the wrapper over the wound after his chest falls but before it rises.SEAL AND DRESS THE OPEN CHEST WOUND
Place the inside surface of the plastic wrapper (the side without printing) directly over the wound. The plastic wrapper makes an airtight seal which keeps air from entering the chest cavity through the wound. Breathing can be resumed.
If the edges of the wrapper do not extend at least two inches beyond the edges of the wound, it may not form an airtight seal and may even be sucked into the wound. If the wrapper is too small, use foil, a poncho, cellophane, or similar material as the seal.
If an object is protruding from the chest wound, place airtight material around the object and stabilize the object with clean, bulky material and bandage. Do not wrap the bandages around the object.
SEAL AND DRESS THE OPEN CHEST WOUND
Tape the top and both sides of the plastic wrapper to the casualty\'s chest. Leave the bottom edge untaped to form a flutter-type valve to allow air to escape through the chest wound, but keep air from entering the chest wound.
Apply the Field Dressing
Remove the field dressing from the paper wrapper.
Open the field dressing and place the white pad directly over the plastic wrapper.SEAL AND DRESS THE OPEN CHEST WOUND
Hold the dressing in place with one hand or have the casualty hold the dressing in place while you secure it.
Grasp one tail, slide it under the casualty, and bring it back over the dressing.
SEAL AND DRESS THE OPEN CHEST WOUND
Wrap the other tail around the casualty in the opposite direction and bring it back over the dressing.
Tighten the tails and tie them with a nonslip knot over the center of the dressing when the casualty exhales. The bandages should keep the dressing and sealing material from slipping, but should not interfere with breathing.SEAL AND DRESS THE OPEN CHEST WOUND
If the casualty is unconscious, tie the knot after his chest falls.
If an object is protruding from the wound, tie the knot beside the object, not on it.
If the sealing material slips while the dressing is being applied or secured, repeat the procedures.
Seal and Dress Other Open Chest Wounds
If both an entry wound and an exit wound are present, both wounds must be sealed in order to stop the collapse of the lung.
SEAL AND DRESS THE OPEN CHEST WOUND
Apply Manual Pressure
Apply direct manual pressure over the dressing for 5 to 10 minutes to help control bleeding.
The casualty can apply the pressure if he is able.
POSITION A CASUALTY WITH AN OPEN CHEST WOUND
Position the casualty on his side with the injured side next to the ground. (If the casualty were to lie on his uninjured side, his uninjured lung would not expand as well.)
If the casualty can breathe easier when sitting up, allow him to sit with his back against a tree or other support.MONITOR A CASUALTY WITH AN OPEN CHEST WOUND
Treat the casualty for shock.
Evacuate the casualty as soon as possible.
If the casualty has increased difficulty in breathing, shortness of breath, or bluish tint to skin, quickly lift the sealing material from the wound, let the air escape with complete expiration, and reseal the wound
APPLY A DRESSING TO AN OPEN CHEST WOUND
CLOSING Once the casualty reaches a medical treatment facility, medical personnel can remove trapped air from the casualty\'s chest and make the lung fully functional again.
Questions APPLY A DRESSING TO AN OPEN ABDOMINAL WOUND
INTRODUCTION An open abdominal wound can be caused by the muscular abdominal wall being penetrated by a bullet, by a stab from a knife, by an object blown from an explosion, or by falling on a sharp object.
APPLY A DRESSING TO AN OPEN ABDOMINAL WOUND
TASK
Identify proper procedures for treating a casualty with an open abdominal wound.
CONDITION
Given multiple-choice items pertaining to open abdominal wounds.
STANDARD
Score 70 or more points on the 100-point written pretest.
POSITION A CASUALTY WITH AN OPEN ABDOMINAL WOUND Position the casualty on his back with his knees up (flexed). This position helps to prevent further exposure of the abdominal organs, lessens pain, and controls shock.DRESS AN OPEN ABDOMINAL WOUND
Locate and Expose Open Abdominal Wound(s)
Check the abdominal region for entry and exit wounds. Check the back using your hand to feel for wounds. Look for a pool of blood.
If more than one open abdominal wound is found, treat the more serious wound first.
Expose the area around the open abdominal wound by removing, cutting, or tearing the clothing around the wound.
DRESS AN OPEN ABDOMINAL WOUND
If clothing is stuck to the wound, cut or tear around the stuck clothing rather than removing the stuck clothing.
Do not probe, clean, or remove foreign objects from the wound.
If you are in a chemical environment, dress the wound without exposing the wound.
DRESS AN OPEN ABDOMINAL WOUND
Position Dislodged Organs, If Applicable
If part of an intestine or other organ has been forced through the wound, use clean, dry material to gently lift the organ. Then position the organ on top of the casualty\'s abdomen.
Do not touch the exposed organ with your hands or try to push the organ back into the body.DRESS AN OPEN ABDOMINAL WOUND
Dress the Wound
Open a field dressing and place the white side of the dressing over the wound and any protruding organs.
If the field dressing is too small, use clothing, part of a blanket, elastic gauze bandages or similar clean materials as a dressing.
If an object is protruding from the wound, stabilize the object with clean, bulky material and bandages.
Hold the dressing in place with one hand to keep it from slipping.
Grasp one tail and slide it under the casualty.DRESS AN OPEN ABDOMINAL WOUND
Reach down on the other side of the casualty, grasp the tail under the casualty, and pull.
Bring the tail up the casualty\'s side, over the dressing, and to the other side.
Wrap the other tail in the opposite direction.
Tie the tails in a nonslip knot on the outer edge of the dressing toward the casualty\'s side. Do not tie the knot over the wound site.
The bandages should be tight enough to keep the dressing from slipping. You should be able to insert two fingers between the knot and the dressing. Elastic gauze bandages over exposed abdominal organs (especially intestines) should be moistened with I.V. solutions using the appropriate tubing.DRESS AN OPEN ABDOMINAL WOUND
Dress Other Abdominal Wound(s)
If other abdominal wounds are present, dress and bandage the wounds.
Reinforce Dressings
If the situation allows and materials are available, cover the dressing(s) with cravats or strips of cloth. Tie the tails of the reinforcing bandages over the other edge of the field dressing (not over the field dressing knot).
Do not tie any knots over the wound site.MONITOR A CASUALTY WITH AN OPEN ABDOMINAL WOUND
Keep the casualty in the knees-up position.
Evacuate the casualty as soon as possible.
Do not give the casualty anything to eat or drink.
If the casualty asks for water, moisten his lips with a damp cloth.
If you leave the casualty, tell him to stay on his back with his knees up.
APPLY A DRESSING TO AN OPEN ABDOMINAL WOUND
CLOSING The abdominal cavity contains the stomach, intestines, liver, kidneys, spleen, and several large arteries and veins. An object that punctures the muscular abdominal wall can injure organs, cause severe bleeding, and cause massive infection. The casualty must be treated at a medical treatment facility as soon as possible. This is tested in the written multiple-choice examination.
Questions APPLY A DRESSING TO AN OPEN HEAD WOUND
INTRODUCTION A head injury may consist of a cut or bruise of the scalp, a concussion, a fracture of the skull with injury to the brain, extruding brain matter, or a combination of these injuries. If the skin has been broken, it is called an open head injury. If the skin has not been broken, it is a closed head injury. Both open and closed head injuries can be severe and life-threatening.
APPLY A DRESSING TO AN OPEN HEAD WOUND
TASK
Apply a dressing to a casualty with an open head wound.
CONDITION
Given a simulated casualty with an open head wound and needed supplies.
STANDARD
Score a GO on the performance checklist.
IDENTIFY SIGNS AND SYMPTOMS OF OPEN AND CLOSED HEAD INJURIES
If the skin is broken, the head injury is \"open.\" If the skin is not broken, the head injury is \"closed.” A closed head injury may be as dangerous to the casualty as an open head injury.
Bleeding from the scalp.
Visible skull fracture and/or visible brain tissue.
Deformity of the head.
Clear or bloody fluid leaking from the nose or ears.
\"Black eyes\" and bleeding in the whites of the eyes.
Bruise behind one or both ears.
Headache, nausea, or vomiting.
IDENTIFY SIGNS AND SYMPTOMS OF OPEN AND CLOSED HEAD INJURIES
Loss of consciousness, (either current or recent unconsciousness).
Vision problems.
Staggering or dizziness.
Drowsiness.
Mental confusion.
Slurred speech.
Convulsions or twitching.
Difficulty in breathing.
Paralysis.
Size of pupils unequal.CHECK A CASUALTY\'S LEVEL OF CONSCIOUSNESS
Ask the casualty to tell you his name, where he is, the month and year, or other information which cannot be answered by a simple yes or no.
Incorrect responses, inability to answer, or changes in responses may indicate a serious head injury.
POSITION A CASUALTY WITH A HEAD INJURY
A casualty with a serious head injury could have a fractured neck. Avoid moving the casualty when possible.
Position the casualty on his side with the wound away from the ground if the casualty is choking, nauseous, vomiting, or bleeding from his mouth.POSITION A CASUALTY WITH A HEAD INJURY
Have the casualty sit up and lean against a support such as a tree if only minor wounds are present. After the wounds are dressed, he can be positioned on his back with his head elevated slightly.
If the casualty is having convulsions, ease him to the ground and gently support his head and neck. Do not try to forcefully hold his arms and legs or put fingers in his mouth.EXPOSE THE HEAD WOUND
Remove the casualty\'s helmet if he is still wearing it.
Do not expose or dress the wound in a chemical environment. If the mask or hood has been breached, repair the breach with tape or wet cloth stuffing if possible.
Do not attempt to clean the wound or attempt to push any brain matter back into the head.
APPLY A DRESSING TO A WOUND ON THE FOREHEAD OR BACK OF THE HEAD
Remove a field dressing from its wrappers.
Grasp a tail in each hand, hold the dressing directly over the wound with the white pad toward the wound, pull the dressing open, and place the pad directly over the wound with the bandages horizontal.
Place one hand on the dressing or have the casualty hold it in place.
Wrap one tail horizontally around the casualty\'s head and bring it back across and past the dressing. Angle the bandage so it will cover the top or bottom edge of the dressing.
Do not cover the casualty\'s eyes or ears with the bandages.APPLY A DRESSING TO A WOUND ON THE FOREHEAD OR BACK OF THE HEAD
Wrap the second tail around the head in the opposite direction.
Bring the tail across the dressing angled so it will cover the other edge (top or bottom) of the dressing.
Continue to wrap the bandage around the head again until it meets the first tail.APPLY A DRESSING TO A WOUND ON THE FOREHEAD OR BACK OF THE HEAD
Tie the tails in a nonslip knot on the side of the head. The bandages should keep the dressing from slipping, but not place undue pressure on the wound.
Tuck any excess bandaging material (tails) under the bandage.APPLY A DRESSING TO THE TOP OF THE HEAD
Remove a field dressing from its wrappers.
Grasp a tail in each hand, hold the dressing directly over the wound with the white pad toward the wound, pull the dressing open, and place the pad directly over the wound with the bandages toward the ears.APPLY A DRESSING TO THE TOP OF THE HEAD
Place one hand on the dressing and grasp the near tail with the other hand.
Bring the tail down in front of the ear, under the chin, up in front of the opposite ear, over the dressing, and to a point just above and in front of the first ear (about a one and one-fourth circle).
Make sure the tail remains wide and close to the chin.
APPLY A DRESSING TO THE TOP OF THE HEAD
Remove your hand from the dressing and grasp the other (free) tail.
Bring that tail down the opposite side of the face in front of the ear, under the chin, and up until it meets the first tail (about a three-fourths circle).
Cross the tails so that each makes a 90 degree turn. The cross should be made slightly above and in front of the ear.
Bring one tail across the casualty\'s forehead and above the eyebrows until it is in front of the opposite ear (about a half circle).APPLY A DRESSING TO THE TOP OF THE HEAD
Bring the other tail back above the ear, low behind the head at the base of the skull, and up to a point above and in front of the opposite ear where it meets the first tail.
Do not cover the casualty\'s eyes or ears.
Tie the tails in a nonslip knot in front of and above the ear.
Tuck in the excess material from the tails.APPLY A DRESSING TO THE CHEEK OR SIDE OF THE HEAD
Remove a field dressing from its wrappers.
Grasp a tail in each hand, hold the dressing directly over the wound with the white pad toward the wound, pull the dressing open, and place the pad directly over the wound with the bandages vertical.
Place one hand on the dressing or have the casualty hold the dressing in place.APPLY A DRESSING TO THE CHEEK OR SIDE OF THE HEAD
Bring the upper tail over the top of the head, down in front of the ear, under the chin, up the side of the face, and over the dressing to a point just above the ear (a full circle).
APPLY A DRESSING TO THE CHEEK OR SIDE OF THE HEAD
Bring the other tail down, under the chin, up the side of the face, in front of the ear, and over the top of the head until it meets the first tail (almost a full circle).
Make sure both tails remain wide and close to the front of the chin. Do not cover the ears if it can be avoided.APPLY A DRESSING TO THE CHEEK OR SIDE OF THE HEAD
Cross the two tails just above the ear on the injured side of the face.
Bring one tail across the forehead (above the eyebrows) to a point just in front of the ear on the uninjured side of the face.
Do not cover the casualty\'s eyes.APPLY A DRESSING TO THE CHEEK OR SIDE OF THE HEAD
Bring the other tail above the ear, low behind the head at the base of the skull, and above the other ear until it meets the first tail.
Tie the tails in a nonslip knot just above and in front of the ear on the uninjured side of the head.
Tuck in the ends of the tails.
If fluid is coming from the casualty\'s ear, put a field dressing over the ear to protect the ear and absorb the drainage.Other Head Dressings
The following dressings are found in FM 21-11
MONITOR A CASUALTY WITH A HEAD INJURY
Position the casualty as in Learning Event # 1.
The scalp may bleed excessively, requiring pressure to control the bleeding.
Evacuate a casualty with a serious head wound, with fluid leaking from an ear, or who does not regain consciousness soon as possible.
Check the casualty\'s level of consciousness every 15 minutes. If he falls asleep, awaken him to check his level of consciousness. Report your observations, including changes, to medical personnel.
Do not give the casualty anything to eat or drink.
APPLY A DRESSING TO AN OPEN HEAD WOUND
CLOSING A head wound may be more serious than it first appears. Any soldier with a head wound should be evaluated by medical personnel.
Questions PREVENT SHOCK
INTRODUCTION There are several causes of shock. On the battlefield, hypovolemic shock due to loss of blood from wounds or burns will be the primary type of shock present. If not properly treated, shock can be fatal. The procedures used to treat shock are also used to help prevent shock from occurring.
PREVENT SHOCK
TASK
Identify the procedures for preventing/controlling shock.
CONDITIONS
Given multiple-choice examination items pertaining to shock.
STANDARD
Score 70 or more points on the 100-point written examination.IDENTIFY THE SIGNS AND SYMPTOMS OF SHOCK
Loss of body fluids from severe bleeding, burns, vomiting, diarrhea, and severe heat illness.
Sweaty but cool (clammy) skin, pale skin color, and/or blotchy or bluish skin around the mouth.
Nausea.
Anxiety (casualty restless or agitated).
Mental confusion.
Increased breathing rate.
Unusual thirst.
POSITION THE CASUALTY TO PREVENT/CONTROL SHOCK
Move the casualty to cover if possible.
Stop heavy bleeding and treat major wounds.
Normal Shock Position
Position the casualty on his back.
If possible, place a poncho or blanket under the casualty to protect him from the temperature or dampness of the ground.
POSITION THE CASUALTY TO PREVENT/CONTROL SHOCK
Elevate the casualty\'s legs so his feet are slightly higher than the level of his heart. Place a small log, field pack, box, rolled field jacket, or other stable object under the casualty\'s feet or ankles to maintain the elevation.
If the casualty has a fractured leg, do not elevate the legs until the fracture has been splinted.
POSITION THE CASUALTY TO PREVENT/CONTROL SHOCK
Shock Positions for Special Injuries
Certain casualties are not placed in the normal position for shock. Check for and splint fractured limbs before moving the casualty.
Suspected fracture of the spine. Do not move a casualty with a suspected spinal fracture or severe head wound. Do not elevate his legs.
Open chest wound. Place the casualty in a sitting position with his back to a wall, tree, or other support or lying on his injured side.
POSITION THE CASUALTY TO PREVENT/CONTROL SHOCK
Open abdominal wound. Place the casualty on his back with his knees flexed.
Minor head wound. Place the casualty in a sitting position with his back to a wall, tree, or other support or lying on his side with the wound away from the ground.
Unconsciousness. Position an unconscious casualty on his side with his head turned so fluids can drain from his mouth.
TAKE ADDITIONAL MEASURES TO PREVENT/CONTROL SHOCK
Reassure the Casualty
Keep the casualty calm.
Tell the casualty that you are helping him. Be confident and have a \"take charge\" attitude.
Do not make comments regarding the casualty\'s condition.
Loosen the Casualty\'s Clothing
Loosen any binding clothing, including boots, if you are not in a chemical environment.
Do not loosen or remove clothing in a chemical environment.
TAKE ADDITIONAL MEASURES TO PREVENT/CONTROL SHOCK
Keep the Casualty From Being Too Warm or Too Cool
In warm weather, move the casualty to a shade or erect an improvised shade using a poncho and sticks or other available materials. Do not cut off air flow. Fan the casualty with a shirt or other material.
In cool weather, cover the casualty with a blanket, poncho, or other materials to keep him warm and dry. Place a poncho under the casualty to prevent chilling due to contact with cold or wet ground.TAKE ADDITIONAL MEASURES TO PREVENT/CONTROL SHOCK
Seek Help or Evacuate Casualty
A combat lifesaver should administer intravenous fluids to help control shock if hypovolemic shock is present. An intravenous infusion can be started before a fracture is splinted.
Evacuate the casualty if practical.
If you leave the casualty to seek help, tell him you are going to get help and will return. Turn the casualty\'s head so fluids can drain from his mouth.
PREVENT SHOCK
CLOSING Hypovolemic shock can be fatal if fluid loss is not controlled and fluids are not replaced. Administering fluids by intravenous infusion is one of the primary combat lifesaver skills and will be covered in the medical phase of the course. This is tested on the written examination.
Questions SPLINT A SUSPECTED FRACTURE
INTRODUCTION A fracture is a break in a bone. It can cause disability and even death. A closed fracture is a break in the bone without a break in the skin. An open fracture is a break in the bone with a break in the overlying skin. Dislocations and sprains are injuries to joints which are treated as though they were fractures.
SPLINT A SUSPECTED FRACTURE
TASK
Splint a suspected fracture of the arm or leg.
CONDITION
Given a simulated casualty with a suspected fracture of the arm or leg and needed materials.
STANDARD
Score a GO on the performance checklist.
IDENTIFY SIGNS AND SYMPTOMS OF A FRACTURED ARM OR LEG
Bone sticking through the skin.
Pain, tenderness, swelling, and/or bruise at a particular location.
Arm or leg appears shorter or is in an abnormal position (looks deformed).
Difficulty in moving an arm or leg.
Do not have the casualty attempt to move the injured arm or leg. Rely upon what the casualty tells you.
Massive injury to an arm or leg.
\"Snapping\" sound may be heard by the casualty at the time of the injury.PREPARE THE CASUALTY
Reassure the Casualty
Tell the casualty that you are taking care of him.
If you must leave the casualty to locate materials needed to make a splint, tell him that you will return quickly.
Locate Site of Fracture
Open fracture -- where the bone has broken the skin.
Closed fracture -- where the pain, tenderness, bruise, abnormal bend in arm, or other indicator is located.PREPARE THE CASUALTY
Check Circulation Below Fracture
Indications of poor circulation include:
Lack of a pulse or a weak pulse below the fracture site.
Slow capillary fill. Press on a fingernail on the injured limb and the corresponding nail on the uninjured limb. Release both nails at the same time. Blood flow is hampered if color returns to the uninjured limb first.
PREPARE THE CASUALTY
Numbness or tingling.
Pale, white, or bluish-gray skin color below the fracture site.
Skin below the fracture site is cooler than the skin on the corresponding location of the uninjured limb.
If the limb has poor circulation, evacuate the casualty as soon as possible.
PREPARE THE CASUALTY
Loosen Clothing
Loosen any clothing that is tight or which binds the casualty.
Boots should not be removed unless they are needed to immobilize an injured neck or unless there is actual bleeding from the foot.
Do not remove or loosen any of the casualty\'s protective clothing if you are in a chemical environment.
PREPARE THE CASUALTY
Remove Jewelry
Rings or other jewelry on the limb could become stuck and interfere with blood circulation if the limb swells. Remove any jewelry on the casualty\'s injured limb and put it into his pocket. Tell him what you are doing.
Dress Wounds
Dress any open wounds (including burns) on the injured limb before applying the splint.
Do not attempt to push the bone back under the skin. Cover exposed bone with a dressing.
Do not attempt to straighten or realign the injured limb.
GATHER SPLINTING MATERIALS
Rigid Objects
Tree branches, poles, boards, sticks, or other rigid objects can be used.
The casualty\'s own chest can be used to immobilize a fractured arm and an uninjured leg can be used to immobilize a fractured leg.
Padding.
Blankets, jackets, ponchos, extra clothing, shelter halves, leafy plants, or the casualty\'s trouser leg or shirt sleeve can be used.
GATHER SPLINTING MATERIALS
Securing Materials
Cravats made from muslin bandages or other material are preferred.
Cut or tear a square about 3 feet on each side from pliable material such as a shirt or sheet if muslin bandages are not used.
Fold the square along the diagonal to form a triangle.
Cut along the fold so that two triangles are formed. (Each triangle becomes a cravat.)
Fold top of the triangle down until the tip of the triangle touches the base (longest side).
Fold a second time and a third time.GATHER SPLINTING MATERIALS
Strips of clothing, belts, pistol belts, bandoleers, and similar materials can be used.
Narrow materials such as wire and cord should not be used since they could interfere with blood circulation.SPLINT THE LIMB
Do not try to straighten or reposition the fractured limb. Splint the limb in the position you find it. Move the limb as little as possible while applying and securing the splint.
Position the Securing Materials
Push the cravats under natural body curvatures, then gently move the securing materials up or down the limb until they are in proper position.
SPLINT THE LIMB
Place at least one cravat (two if possible) above the fracture site and at least one cravat (two if possible) below the fracture site.
If possible, place one cravat above the upper joint, one between the upper joint and the fracture, one between the fracture and the lower joint, and one below the lower joint.
Do not place a cravat directly under the fracture site.
SPLINT THE LIMB
Position the Rigid Objects
If two rigid objects are available, place one on each side of the injured limb.
When possible, position the rigid objects so the joint above the fracture and the joint below the fracture can be immobilized.
Make sure the ends of the rigid objects are not pressing against the armpit or groin.
SPLINT THE LIMB
Apply Padding
Place padding between the rigid objects and the limb.
Place extra padding at bony or sensitive areas such as the elbow, wrist, knee, ankle, groin, or armpit.
SPLINT THE LIMB
Secure the Rigid Objects
Wrap the cravats around the rigid objects and limb to secure the rigid objects and immobilize the limb.
Tie the ends (tails) of each cravat in a nonslip knot on the outer rigid object and away from the casualty.
The securing material should be tight enough to hold the rigid objects securely in place, but not tight enough to interfere with blood circulation.
SPLINT THE LIMB
Check Circulation
Observe the limb below the cravats for signs of impaired circulation as you secure the rigid objects. If possible, check the circulation after each cravat is tied. Recheck the limb for numbness, color, temperature, and pulse after the cravats have been applied.SPLINT THE LIMB
Loosen the Securing Materials, If Needed
If your first check showed normal circulation and your check now shows poor circulation, untie the cravats. Reposition any rigid object which could interfere with circulation, such as one pressing against the armpit or groin. Add padding, if needed. Retie the cravats and recheck the circulation.
If the limb still has poor circulation, evacuate the casualty as soon as possible.
APPLY A SLING AND SWATHE TO A FRACTURED ARM
If the elbow is not fractured, form a sling for the fractured arm. A jacket flap sling can be used if no materials are available for a triangular sling.
If the elbow is fractured, splint the arm in the position found. Do not bend the elbow to fit the arm into a sling.
Apply a Triangular Bandage Sling
Form a triangular cloth from a muslin bandage or other material (same as making a triangular bandage for a cravat or tourniquet band).
APPLY A SLING AND SWATHE TO A FRACTURED ARM
Insert the material under the injured arm so the arm is in the center, the apex of the sling is beyond the elbow, and the top corner of the material is over the shoulder of the injured side.
Position the forearm with the hand slightly raised (about 10 degree angle).
Bring the lower portion of the material over the injured arm and over the shoulder of the uninjured side.
Tie the two corners in a nonslip knot on the side of the neck on the uninjured side.
Twist the apex of the sling and tuck it in at the elbow.APPLY A SLING AND SWATHE TO A FRACTURED ARM
Apply a Jacket Flap Sling
Position the forearm on the casualty\'s chest with the hand positioned slightly higher than the elbow.
Undo the lower part of the casualty\'s BDU or field jacket (coat).
Bring the flap up over the forearm to the pocket area.
Position the elbow so it will not slip out of the sling.
Secure the flap by pushing a stick or other rigid object through the flap and the upper portion of the jacket.APPLY A SLING AND SWATHE TO A FRACTURED ARM
Apply Swathes
Use a large strip of cloth, muslin bandage, field dressing, blanket strip, pistol belt, trouser belt, bandoleer, or other wide material as the swathe.
Place one end of the swathe at the breast pocket nearest the uninjured arm.
Wrap the swathe across the sling, around the upper arm on the injured side, behind the casualty\'s back, under the uninjured arm, and back to the breast pocket.
Do not apply a swathe on top of the fracture site.APPLY A SLING AND SWATHE TO A FRACTURED ARM
Tie the two ends in a nonslip knot over the breast pocket on the uninjured side.
Two swathes, one above the fracture and one below the fracture, are normally applied when the chest is used as a rigid object for splintingOther Splints
The following splints are found in FM 21-11SPLINT A SUSPECTED FRACTURE
CLOSING Even if the arm or leg is not broken, the pain caused by a severe wound can be lessened if the arm or leg is splinted after it has been dressed and bandaged. A fractured limb may need to be splinted before the casualty is repositioned to treat or prevent shock.
Questions IMMOBILIZE A SUSPECTED SPINAL INJURY
INTRODUCTION The spinal column of the neck and back surrounds and protects the nerves of the spinal cord. If the spinal cord is cut, the muscles and sensations controlled by the portion of the spinal cord below the cut will not function. Always check a casualty who may have fallen or been hit in the back for spinal injury. If the casualty has suffered a severe head injury, assume the casualty also has spinal damage.
IMMOBILIZE A SUSPECTED SPINAL INJURY
TASK
Identify proper procedures for immobilizing a suspected spinal injury.
CONDITION
Given multiple-choice items pertaining to spinal injuries.
STANDARD
Score 70 or more points on the 100-point written examination
IDENTIFY SIGNS AND SYMPTOMS OF A FRACTURED SPINE
Pain or tenderness of the neck or back.
Cut or bruise on the neck or back.
Inability to move part of the body (paralysis), especially the legs.
Lack of feeling in a body part.
Touch the casualty\'s arms and legs and ask if he feels your hand.
Loss of bladder and/or bowel control.
Weak respiration.
Head or back in an unusual position.
MOVE A CASUALTY WITH A SUSPECTED SPINAL INJURY, IF NECESSARY
Do not move a casualty with a suspected spinal injury unless it is necessary to save his life, such as moving the casualty from a burning building or away from enemy fire or positioning a nonbreathing casualty to perform mouth-to-mouth resuscitation.
Use a four-man arms carry to move the casualty to a place of safety.
One soldier (usually the combat lifesaver) kneels at the casualty\'s head and places his hands on both sides of the casualty\'s head. This bearer keeps movement of the casualty\'s head and neck to a minimum when the casualty is moved.
MOVE A CASUALTY WITH A SUSPECTED SPINAL INJURY, IF NECESSARY
The second soldier kneels at the casualty\'s chest and slips his arms under the casualty\'s shoulders and waist.
The third soldier kneels next to the second soldier and slips his arms under the soldier\'s hips and thighs.
The fourth soldier kneels next to the third soldier and slips his arms under the soldier\'s legs (or knees) and ankles.
MOVE A CASUALTY WITH A SUSPECTED SPINAL INJURY, IF NECESSARY
On the command, \"Lift,\" from the leader, all soldiers rise to their knees in unison, keeping the casualty\'s head and spine in straight alignment.
If a spine board is available or one can be improvised from a door or board, the casualty should be lowered onto the spine board and secured to the spine board. The casualty should then be lifted and moved to a safe location.
On the command, \"Turn,\" from the leader, the soldiers gently turn the casualty toward their chests as the leader gently turns the casualty\'s head to maintain spinal alignment.
MOVE A CASUALTY WITH A SUSPECTED SPINAL INJURY, IF NECESSARY
On the command, \"Rise,\" from the leader, the soldiers stand in unison, maintaining alignment of the head and spine. The casualty is then carried out of danger.
When a safe location is reached, the soldiers gently lower the casualty onto a flat surface by reversing the lifting procedures and fully immobilize the casualty as described in the following learning event.
IMMOBILIZE THE CASUALTY\'S SPINE
Do not attempt to straighten the casualty\'s neck or back if it is in an abnormal position.
Tell the casualty to keep still and avoid unnecessary movement.
Send someone to get medical help.
If the casualty is lying on his stomach, keep him from moving until medical help arrives.
If the casualty is lying on his back, use padding to help immobilize his back, neck, and head as described below.
IMMOBILIZE THE CASUALTY\'S SPINE
Roll or fold a blanket or similar padding to conform with the normal shape of the arch of the back. Carefully slide the padding under the arch of his back.
Slide a roll of cloth under the casualty\'s neck to help support and immobilize his neck.
Place padded rocks, small padded logs, or filled boots on each side of the casualty\'s head to keep it from moving. To use boots:
IMMOBILIZE THE CASUALTY\'S SPINE
Remove the casualty\'s boots. Do not remove the casualty\'s boots if in a chemical environment.
Fill each boot almost to the top with sand or small rocks.
Place material (strip of clothing, sock, etc.) on top of the sand or rocks to keep the sand or rocks from falling out.
Tie the top of each boot to keep the material from coming out.
Place the boots around the casualty\'s head so that the head will not turn.
IMMOBILIZE A SUSPECTED SPINAL INJURY
CLOSING A casualty with a suspected neck or spinal fracture should be moved by medical personnel whenever possible. If you must move the casualty to save his life, keep the movement of his back and neck to a minimum. This is tested on the written examination.
Questions GIVE FIRST AID FOR BURNS
INTRODUCTION If a casualty is being burned, you must first eliminate the source of the burn in order to protect both the casualty and yourself. Once the immediate danger has been removed or controlled, check the casualty for breathing, control any major bleeding, and take measures to control or prevent shock.
GIVE FIRST AID FOR BURNS
TASK
Identify the proper procedures for treating a casualty with burns.
CONDITION
Given multiple-choice items pertaining to burns.
STANDARD
Score 70 or more points on the 100-point written
CLASSIFY BURN AS TO TYPE
Burns can be classified by cause and by severity. Burns can result from thermal, electrical, chemical, or radiant sources. They are usually rated as being first, second, or third degree in severity.
Causes
Thermal burns are caused by heat. They can be caused by a flame, a hot object, steam, or the fireball from a nuclear explosion.
Electrical burns are caused by an electrical current passing through the body, such as from coming into contact with a \"live\" electrical wire.CLASSIFY BURN AS TO TYPE
Chemical burns are caused by liquid or dry chemicals such as ammonia, caustic soda, quick-lime, or white phosphorus (WP).
Radiant energy burns can be caused by lasers, electric welding arcs, ultraviolet light, and microwaves. The primary danger is to the eyes.
Severity
First degree burns -- The skin is red and painful like a sunburn, but blisters are not present.
Second degree burns -- The skin is red and painful; blisters are present.
CLASSIFY BURN AS TO TYPE
Third degree burns -- The skin layers are destroyed and underlying fat, muscles, and/or bone may also be damaged. The burn area may not be painful because the nerves have been destroyed, but the surrounding second and first degree burn areas may be painful.PUT OUT FLAMES
If the casualty\'s clothing is on fire, cover the casualty with a large piece of nonsynthetic material (such as a wool or cotton blanket) and roll the casualty on the ground until the flames are smothered.
If nonsynthetic material cannot be obtained quickly, get the casualty to the ground and have him roll on the flame until it goes out.
Do not use synthetic materials such as nylon and rayon because they may melt and cause additional injury.
REMOVE A CASUALTY FROM ELECTRICAL CURRENT
If the casualty is lying on an electrical wire, assume the electrical wire is carrying electrical current and can be a danger to yourself as well as to the casualty.
Do not touch the electrical wire with your hands.
Do not touch the casualty since the current can pass from the wire and through the casualty to you.
REMOVE A CASUALTY FROM ELECTRICAL CURRENT
Stop the Current
If the electrical current can be turned off quickly, such as flipping a switch, turn it off before removing the casualty from the wire.
Treat the wire as though it were still carrying current even if you think you turned off the current.
If it is quicker to separate the casualty from the wire, remove the casualty from the wire and administer aid first.
REMOVE A CASUALTY FROM ELECTRICAL CURRENT
Separate Casualty and Wire
Two-rescuers: Slide a dry rope, dry clothing, or other material which will not readily conduct electricity under the casualty\'s body and lift the casualty from the wire. Have a second person use a wooden limb or other long, nonconducting object to push the wire away from the casualty.
One rescuer: Wrap dry rope or similar material around the casualty limb or limbs and drag the casualty away from the wire.REMOVE A CASUALTY FROM ELECTRICAL CURRENT
Check for Breathing
Check the casualty\'s respiration after you have separated him from the current. Administer mouth-to-mouth resuscitation if needed.
REMOVE CHEMICALS THAT CAUSE BURNS
Liquid Chemicals
Pour as much water as possible over the burned area.
If a sufficient amount of water is not available, use any nonflammable fluid to flush the area.
Dry Chemicals
Use a clean, dry cloth to brush off loose particles on the skin and flush the skin with as much water or nonflammable liquid as possible.
Do not flush dry chemicals unless water or other nonflammable fluid is available in large amounts. When combined with water, the chemical may change into an active, burning substance.
REMOVE CHEMICALS THAT CAUSE BURNS
White Phosphorus
White phosphorus burns when exposed to air. Quickly smother the flame with water; then cover the area with wet material or mud to prevent air from reaching the white phosphorus. Keep the material covering the phosphorus wet and occluded from air. Get medical help or evacuate the casualty.
Do not attempt to remove the white phosphorus particles from the casualty\'s flesh.
Do not use grease or oil on the white phosphorus burn since they may cause the body to absorb the poisonous particles.
Do not use copper sulfate.
REMOVE CHEMICALS THAT CAUSE BURNS
Fallout
Brush off loose radioactive particles sticking to the casualty\'s clothing and skin and flush the skin with as much water as possible.
Chemicals in the Eye
Flush the eye with water as quickly as possible.
Position the casualty\'s head with the eye to be flushed lower than the other eye. This keeps chemicals from the eye being flushed from flowing into the other eye.
REMOVE CHEMICALS THAT CAUSE BURNS
Hold the casualty\'s eyelid open.
Pour the water gently into the eye. Pour from the inner edge of the eye (end closest to the nose) to the outer edge.
Continue to flush the eye with water for at least 20 minutes.
TREAT RADIANT ENERGY (LASER) BURNS OF THE EYE
Laser burns cause an immediate decrease in the ability to see.
Protect the casualty from additional exposure to the radiant energy source and keep the casualty out of bright sunlight.
The casualty\'s eyes do not need to be bandaged, but he may feel more comfortable if a dark cloth or loose bandage is placed over his eyes if he does not need to walk or continue to perform his mission. If a bandage is applied, bandage only the involved eye.
Evacuate the casualty when the mission allows.
TREAT SKIN BURNS
At the time of the burn, apply copious amounts of water to the burn site.
Expose Burned Area(s)
Cut and gently lift away any clothing covering the burned area.
Do not pull clothing over the burned area.
Leave any piece of clothing that sticks to the burned area in place.
If you are in a chemical environment, do not expose the wound. Apply the dressing over the casualty\'s clothing.
TREAT SKIN BURNS
Remove Jewelry
Remove any jewelry from the burned limb and put it in the casualty\'s pocket. The jewelry which is not removed now may have to be cut off later if the limb swells sufficiently.
Dress and Bandage Burned Area(s)
Apply a field dressing over the burn wound and secure the dressing using the attached tails.
If the burn is an electrical burn, find and dress both the entry and the exit burn wound. The sole of the foot is a common location for the exit burn.
TREAT SKIN BURNS
If the burned area is large, use the cleanest material available to cover the burned area.
Do not try to clean the burned area before applying the dressing.
Do not apply any grease, ointments, or medications to the burned area.
Do not break any blisters that have formed.
Check for Shock
Fluid lost through burns is a cause of shock.
TREAT SKIN BURNS
Take appropriate measures to prevent shock or control shock.
If the casualty has second and third degree burns on 20 percent or more of his body, fluids should be administered intravenously.
If the casualty is not in shock and is not nauseated, give him small amounts of cool water to drink.
Get Medical Help
Seek medical help or evacuate the casualty, if practical.
Electrical burns can be far more serious than they first appear since most of the damage is done to the interior of the body.
GIVE FIRST AID FOR BURNS
CLOSING A casualty with serious burns should receive intravenous fluids and be evacuated as soon as possible. If the burns to the skin are minor, the casualty should be evaluated by a medical person when possible since the burn is an open wound which can easily become infected if not treated. This is tested on the written examination.
Questions ADMINISTER FIRST AID TO A NERVE AGENT CASUALTY
INTRODUCTION A soldier showing signs of mild nerve agent poisoning will normally be able to take care of himself. A soldier showing signs of moderate to severe nerve agent poisoning, however, will not be able to adequately help himself and must have assistance.
ADMINISTER FIRST AID TO A NERVE AGENT CASUALTY
TASK
Identify the buddy-aid procedures for treating a nerve agent casualty.
CONDITIONS
Given multiple-choice examination items pertaining to nerve agent poisoning, buddy-aid treatment, and decontamination.
STANDARD
Score 70 or more points on the 100-point written examination.
TAKE PROTECTIVE MEASURES
Anytime you believe you have been or will be exposed to a chemical agent, your first action must be to protect yourself. You cannot continue with your mission or administer aid to casualties if you are overcome by the chemical warfare agent.
Put on your protective mask immediately and give the alarm.
TAKE PROTECTIVE MEASURES
If you have signs and symptoms of mild nerve agent poisoning (unexplained runny nose, sudden headache, dizziness, drooling, tightness in the chest, muscular twitching, stomach cramps, nausea, and/or reduced vision), administer one set of nerve agent autoinjectors to yourself and decontaminate your exposed skin.
Put on the rest of your protective clothing.IDENTIFY SIGNS OF SEVERE NERVE AGENT POISONING
A casualty may progress from mild to moderate to severe nerve agent poisoning signs. Signs of severe nerve agent poisoning include:
Strange and confused behavior.
Coughing, wheezing, and gurgling sounds while breathing.
Difficulty in breathing.
Severely pinpointed pupils.
Red eyes with tears present.
IDENTIFY SIGNS OF SEVERE NERVE AGENT POISONING
Vomiting.
Severe muscular twitching and general weakness.
Loss of bladder and bowel control.
Decreased pulse failure (or respiratory arrest) [casualty stops breathing].
MASK THE CASUALTY
Put the casualty\'s mask on him immediately if he is not masked. If he is already masked, check the seal.
Position the casualty on his back.
Squat, do not kneel, in a chemical environment. Pressing your knee against the contaminated ground will reduce the protection time afforded by your protective clothing.
Open the casualty\'s mask carrier and remove his protective mask.
Hold the mask with the lenses facing you.
MASK THE CASUALTY
Put your thumbs on the outside of the cheek pouches of the mask and your fingers on the inside of the cheek pouches.
Spread the mask open and position it on the casualty\'s chin.
Put your thumbs through the two bottom straps of the head harness.
Cup the casualty\'s head with the fingers of both hands and lift his head slightly.
Slide the head harness over the casualty\'s head by moving your thumbs toward the back of the casualty\'s head and down behind his ears.
MASK THE CASUALTY
Make sure the two bottom straps of the head harness are below the casualty\'s ears, the temple straps are above his ears, and the head pad is centered in the middle of the back of his head.
The head harness should not need to be adjusted. If the straps do need to be tightened, tighten them using short, firm, jerks.
Check the seal of the mask against the casualty\'s face.
If the casualty can follow instructions, have him clear his mask by covering the outlet valve and voicemitter and exhaling forcefully, then covering the inlet valves and inhaling.
MASK THE CASUALTY
If the casualty cannot follow instructions, cover the mask\'s inlet valves. If the mask collapses when the casualty inhales, it is properly sealed. If it does not collapse, reseat the mask. If the soldier is not breathing, you cannot determine whether the mask is properly sealed.
Make sure the buckles are lying flat and the straps form a straight line with the tabs.
Pull the protective hood over the casualty\'s head, neck, and shoulders.
ADMINISTER THREE NERVE AGENT ANTIDOTE KITS AND CANA
Select Injection Site
The normal injection site is the outer part of the casualty\'s thigh at least the width of one hand below the hip joint and at least the width of one hand above the knee.
If the casualty is very thin, roll the casualty onto his stomach or side and select a site on the upper, outer quadrant of the casualty\'s buttocks. Lift his jacket if it is covering the site.
ADMINISTER THREE NERVE AGENT ANTIDOTE KITS AND CANA
Administer Atropine
Remove one Mark I nerve agent antidote kit from the inside pocket of the casualty\'s mask carrier.
If the temperature is near or below freezing, the autoinjectors may be carried next to the casualty\'s body.
Hold the kit by the clip in your nondominant hand at eye level with the larger (2-PAM chloride) autoinjector on top.
Feel the injection site with your free hand to make sure the site is free from buttons or other obstructions which could damage the needle.ADMINISTER THREE NERVE AGENT ANTIDOTE KITS AND CANA
Grasp the body of the lower (smaller) autoinjector with the thumb and two fingers of your dominant hand.
Do not touch the green (needle) end of the autoinjector since the pressure could cause the needle to function.
Pull the atropine autoinjector out of the clip with a smooth motion.
Form a fist around the autoinjector and place the green end of the autoinjector against the injection site (thigh or buttocks) at a 90 degree angle to the surface of the site.ADMINISTER THREE NERVE AGENT ANTIDOTE KITS AND CANA
Apply firm even pressure to the autoinjector until the needle functions (clicks), penetrates the clothing, and automatically injects the medication into the casualty\'s muscle.
Do not use a jabbing motion to inject the antidote into the muscle.
Hold the autoinjector in place for at least 10 seconds.
Pull the autoinjector out of the casualty\'s body at the same 90 degree angle.
Place the used atropine autoinjector between two fingers of the hand holding the kit with the needle pointing away from your hand.ADMINISTER THREE NERVE AGENT ANTIDOTE KITS AND CANA
Administer 2-PAM Chloride
Grasp the body of the remaining (2-PAM chloride) autoinjector with the thumb and two fingers of your free hand.
Pull the autoinjector out of the clip in a smooth motion.
Do not touch the black (needle) end of the autoinjector.
Form a fist around the autoinjector and place the black end of the autoinjector against the injection site at a 90 degree angle.
Apply firm, even pressure until the needle functions.
Do not use a jabbing motion.ADMINISTER THREE NERVE AGENT ANTIDOTE KITS AND CANA
Hold the autoinjector in place for at least 10 seconds.
Pull the autoinjector out of the casualty\'s body at the same 90 degree angle.
Drop the empty plastic clip without dropping the autoinjectors.
Lay the used autoinjectors on the casualty\'s chest or back.
Administer Second and Third Kits
Administer the second Mark I kit using the same procedures as for the first kit.
ADMINISTER THREE NERVE AGENT ANTIDOTE KITS AND CANA
Administer the third kit of autoinjectors.
There is no waiting period between kits.
If the casualty already administered one set of injectors to himself (used autoinjectors attached to pocket flap), you will only administer the two additional Mark I kits.
The CANA is NOT for use as self-aid. If you know who you are, where you are, and what you are doing, you do not need CANA.
Administer the CANA immediately after the third MARK I to prevent convulsions.
ADMINISTER THREE NERVE AGENT ANTIDOTE KITS AND CANA
Grasp the CANA autoinjector with your dominant hand with the needle end extending beyond your thumb and two fingers.
With your other hand, pull the safety cap off the autoinjector base.
The injector is now armed.
DO NOT touch the black (needle) end because you may accidently inject yourself.
Position the black (needle) end of the autoinjector against the casualty\'s injection site (thigh or buttocks).ADMINISTER THREE NERVE AGENT ANTIDOTE KITS AND CANA
Apply firm, even pressure (not a jabbing motion) to the injector until it pushes the needle into the casualty\'s thigh (or buttocks). Make sure you do not hit the casualty\'s mask carrier or any objects in the individual\'s pockets.
Hold the injector firmly in place for at least 10 seconds.
Carefully remove the CANA autoinjector from the casualty\'s injection site.
Drop the safety cap. (The cap can be disposed of earlier.)
ADMINISTER THREE NERVE AGENT ANTIDOTE KITS AND CANA
Secure Used Autoinjectors
Attach used autoinjectors, atropine, PAM chloride, and CANA to the casualty\'s clothing, usually the left pocket flap.DECONTAMINATE EXPOSED SKIN
Obtain M291 Kit
Obtain the M291 decontamination kit from the casualty\'s mask carrier.
The M291 Skin Decontaminating Kit is provided to service members for skin decontamination. This kit may also be used to decontaminate selected individual equipment, such as load bearing equipment, protective gloves, mask, hood, and weapon.
Seek overhead cover or use a poncho for protection against further contamination.DECONTAMINATE EXPOSED SKIN
Decontaminate Hands
Remove one skin decontaminating packet from the carrying pouch.
Tear open quickly at notch. Although any notch may be used to open the packet, opening at the TEAR LINE will place applicator pad in a position that is easier to use.
Remove applicator pad from packet and discard empty packet.
Unfold applicator pad and slip finger(s) into handle.DECONTAMINATE EXPOSED SKIN
Thoroughly scrub exposed skin on the casualty\'s hands (back of hand, palm, and fingers) until completely covered with black powder from the applicator pad.
Decontaminate Face
Thoroughly scrub exposed skin of the casualty\'s face until completely covered with black powder from the applicator pad.
Have casualty hold his breath, close his eyes. Grasp his mask beneath chin, and pull hood and mask away from chin enough to allow one hand between the mask and the face. Hold mask in this position until you discard the applicator pad.
DECONTAMINATE EXPOSED SKIN
Scrub up and down across face beginning at from of one ear to nose to other ear.
Scrub across face to corner of nose.
Scrub extra stroke at corner of nose.
Scrub across nose and tip of nose to other corner of nose.
Scrub extra stroke at corner of nose.
Scrub across face to other ear.
DECONTAMINATE EXPOSED SKIN
Next scrub up and down across face to mouth to other end of jawbone.
Scrub across cheek to corner of mouth.
Scrub extra stroke at corner of mouth.
Scrub across closed mouth to center of upper lip.
Scrub extra stroke above upper lip.
Scrub across closed mouth to other corner of mouth.
Scrub extra stroke at corner of mouth.
Scrub across cheek to end of jawbone.
DECONTAMINATE EXPOSED SKIN
Next, scrub up and down across face to chin and to other end of jawbone.
Scrub across the under jaw to chin, cupping.
Scrub extra stroke at center of chin.
Scrub across the under jaw to the end of the jawbone.
Turn your hand out, and quickly wipe the inside of the mask that touches the face.
Discard applicator pad.
Immediately seal mask, clear, and check it.
Remove second skin decontaminating packet from carrying pouch.
Tear open quickly at notch.
Remove applicator pad from packet and discard empty packet.
DECONTAMINATE EXPOSED SKIN
Decontaminate Neck
If the casualty was already masked when becoming contaminated, without breaking the seal between the face and mask, thoroughly scrub skin of neck and ears until completely covered with black powder.
Redo hands until completely covered with black powder.
Discard applicator pad.
Put the protective gloves on the casualty.
Fasten casualty\'s hood.
Remove powder with soap and water when operational conditions permit. It does not matter how long the powder stays on your skin.
Bury the used pads and packets if circumstances permit.
ADMINISTER FIRST AID TO A NERVE AGENT CASUALTY
CLOSING Masking the casualty, administering three Mark 1 kits and CANA, and decontaminating exposed skin are initial treatment measures for a nerve agent casualty. The medical phase of the combat lifesaver course presents additional treatment procedures for severe nerve agent casualties and treatment for victims of other types of chemical agents. This is tested on the written examination.
Questions TRANSPORT A CASUALTY USING A TWO-MAN CARRY OR AN IMPROVISED LITTER
INTRODUCTION A soldier who is seriously injured will need to be evacuated to a medical treatment facility. Sometimes a vehicle can be used to transport the soldier. At other times, he must be carried to the aid station or to a collection point. If a standard litter is available and soldiers are available to use as litter bearers, evacuate the casualty on the litter.
TRANSPORT A CASUALTY USING A TWO-MAN CARRY OR AN IMPROVISED LITTER
INTRODUCTION
If a standard litter is not available but materials are available to make an improvised litter and soldiers are available to use as litter bearers, construct an improvised litter and evacuate the casualty on the litter. If litters or time is not available, evacuate the casualty using a two-man manual carry. If only one person can be spared to evacuate the casualty, use a one-man manual carry to transport the casualty.
TRANSPORT A CASUALTY USING A TWO-MAN CARRY OR AN IMPROVISED LITTER
TASK
Construct and use an improvised litter.
CONDITIONS
Given materials for constructing an improvised litter and an assistant.
STANDARD
Score a GO on the performance checklist.
TRANSPORT A CASUALTY USING A TWO-MAN CARRY OR AN IMPROVISED LITTER
TASK
Transport a casualty using an appropriate two-man carry.
CONDITIONS
Given a simulated casualty and an assistant.
STANDARD
Score a GO on the performance checklist.
CHOOSE THE APPROPRIATE METHOD TO MOVE A CASUALTY ON THE BATTLEFIELD
The following methods of transporting a casualty are given in the order of preference.
Preferred method: Military vehicle, preferably an air or ground ambulance (discussed in more detail in IS0825).
Second method: Litter, preferably a standard litter if litter and two or more litter bearers are available; otherwise, an improvised litter if materials, time, and bearer(s) are available.
CHOOSE THE APPROPRIATE METHOD TO MOVE A CASUALTY ON THE BATTLEFIELD
Third method: Manual carry, preferably a two-man carry if an assistant is available; otherwise, a one-man carry.
Do not transport a casualty with a suspected fracture of the neck or back unless it is necessary to save his life. Use a back board if available. Wait until medical personnel arrive, if possible.
MAKE AN IMPROVISED POLE AND PONCHO LITTER
Obtain two tent poles (or straight tree limbs) and a poncho.
Open the poncho and lay it flat on the ground.
Lay two poles lengthwise across the poncho so the poncho is divided into thirds.
Reach in and pull the hood toward you and lay it flat on the poncho. Make sure the drawstrings are not hanging out of the hole.
Fold one outer third of the poncho over the pole.
Fold the other outer third of the poncho over its pole.
The weight of the casualty will keep the litter from coming apart.MAKE AN IMPROVISED POLE AND JACKET LITTER
Obtain two tent poles (or straight tree limbs) and two or three field jackets (or heavy shirts).
Close (zip or button) the garments.
Turn the garments inside out, but leave the sleeves inside. (Having buttons and zippers inside keep them from catching on bushes.)
Pass the poles through the sleeves.MAKE AN IMPROVISED POLE AND SACK LITTER
Obtain two tent poles (or straight tree limbs) and two empty, heavy-fabric sacks such as potato sacks.
Cut holes in the two corners of the closed end of each sack.
Place the sacks lengthwise with the open end of the sacks facing each other.
Slide the poles or limbs through the holes.
Overlap the open ends of the sacks about three
inches to provide extra strength in the middle of the litter.MAKE AN IMPROVISED BLANKET LITTER
Lay a blanket on the ground.
Roll two opposite edges of the blanket toward the middle. The rolled edges of the blanket will serve as grips.EVACUATE A CASUALTY BY LITTER
A casualty is usually placed on a litter using the modified two-man arms carry or modified two-man fore-and-aft carry.
Normally, four soldiers are used to transport the litter. The litter team, however, can be composed of more or fewer members based upon the military situation and the distance and terrain to be covered.
EVACUATE A CASUALTY BY LITTER
General Rules
Tell the casualty what you are going to do in order to calm his fears and get his cooperation.
Walk around the casualty rather than stepping over him.
Make sure needed treatment procedures (tourniquets, splints, etc.) have already been performed before transporting the casualty unless immediate transportation is needed to save the casualty\'s life.
EVACUATE A CASUALTY BY LITTER
General Rules (cont)
Have one person give instructions so actions will be performed in unison.
Avoid causing additional injury to the casualty when placing him on the litter and moving the casualty.
EVACUATE A CASUALTY BY LITTER
Position Casualty and Litter
Position the casualty on his back with his arms at his side. Place the litter (standard or improvised) near and parallel to the casualty.
EVACUATE A CASUALTY BY LITTER
Place Casualty Onto Litter Using the Modified Two-Man Arms Carry
Two litter bearers kneel on one knee by the casualty\'s side (opposite side from litter).
One bearer slips his arms under the casualty\'s back and waist.
The other bearer slips his hands under the casualty\'s hips and knees.
Both bearers lift in unison upon command from the leader.
EVACUATE A CASUALTY BY LITTER
Two-Man Arms Carry (cont)
Bearers move the casualty over the litter or have another soldier push the litter under the casualty.
Bearers lower the casualty onto the litter in unison upon the leader\'s command.
EVACUATE A CASUALTY BY LITTER
Place Casualty Onto Litter Using the Modified Two-Man Fore-and-Aft Carry
One bearer kneels behind the casualty\'s head and slips his arms under the casualty\'s arms and across his chest; then locks his hands together.
The other bearer spreads the casualty\'s legs apart and squats or kneels between the casualty\'s legs while facing the first bearer.EVACUATE A CASUALTY BY LITTER
Two-Man Fore-and-Aft Carry (cont)
Both bearers rise in unison upon the leader\'s command.
Bearers move the casualty over the litter.
Bearers lower the casualty onto the litter in unison upon the leader\'s command.
EVACUATE A CASUALTY BY LITTER
Lift Litter Using a Four-Man Litter Carry
The leader of the litter team positions himself at the handle nearest the casualty\'s right shoulder and directs the other bearers.
Each of the three other litter bearers positions himself at one of the handles, faces the same direction as the leader (casualty is usually carried feet first), and kneels on the knee nearest the litter.
Upon command, the litter bearers stand up, lifting the litter in unison, and move the casualty to the aid station or collection point.MOVE A CASUALTY USING THE TWO-MAN FORE-AND-AFT CARRY
The two-man fore-and-aft carry is used to transport a conscious or unconscious casualty and is the preferred two-man carry for moving a casualty for a long distance.
Position the casualty on his back with his arms by his side.
The taller of the two bearers kneels at the casualty\'s head and faces toward the casualty\'s feet, slides his hands under the casualty\'s arms and across the casualty\'s chest, and locks his hands together over the casualty\'s chest.MOVE A CASUALTY USING THE TWO-MAN FORE-AND-AFT CARRY
The second bearer spreads the casualty\'s legs, kneels between the casualty\'s legs with his back to the other bearer, and grasps under the casualty\'s knees.
Both bearers rise together, lifting the casualty.
Both bearers walk forward with the casualty.MOVE A CASUALTY USING THE TWO-MAN SUPPORT CARRY
This two-man support carry is used to transport a conscious or unconscious casualty, but is especially useful if the casualty is conscious since he may be able to walk or hop with assistance.
Bearers kneel on each side of the casualty and face the same direction as the casualty.
Each bearer takes the casualty\'s arm nearest the bearer, brings it around his neck, and grasps the casualty\'s wrist with his outside hand.MOVE A CASUALTY USING THE TWO-MAN SUPPORT CARRY
Each bearer puts his other arm around the casualty\'s waist.
Both bearers rise in unison, lifting the casualty.
If the casualty is unconscious, the bearers should not release the casualty\'s wrists.
If the casualty is taller than the bearers, the bearers can remove their arms from the casualty\'s waist and use them to lift and support the casualty\'s thighs. This keeps the feet from dragging.
Bearers walk forward with the casualty.MOVE A CASUALTY USING THE TWO-MAN ARMS CARRY
The two-man arms carry can be used to move a conscious or unconscious casualty for a moderate distance.
More than two bearers may be required if the casualty is heavy or if the casualty\'s head or legs need additional support.
Position the casualty on his back and place his hands on his abdomen.
Both bearers position themselves on the same side of the casualty--one at the casualty\'s chest and one at his thighs.MOVE A CASUALTY USING THE TWO-MAN ARMS CARRY
Both bearers kneel on one knee.
The bearer at the casualty\'s chest slips one arm beneath the casualty\'s shoulders and the other arm beneath his waist.
The bearer at the casualty\'s thighs slips one arm beneath the casualty\'s hips and the other arm beneath his knees.
Both bearers shift their weight backward in unison and lift the casualty to knee level, keeping the casualty as level as possible.
MOVE A CASUALTY USING THE TWO-MAN ARMS CARRY
Both bearers bring the casualty\'s front close to their chests.
Both bearers rise to their feet in unison.
Both bearers move forward, carrying the casualty high on their chest to lessen fatigue.MOVE A CASUALTY USING THE TWO-HAND SEAT CARRY
The two-hand seat carry can be used to move a conscious or unconscious casualty for a short distance.
Position the casualty on his back.
Bearers position themselves on opposite sides of the casualty\'s hips and kneel.
Each bearer passes one arm under the casualty\'s back and the other arm under the casualty\'s thigh.
The bearers grasp each other\'s wrists securely.
Both bearers rise in unison, lifting the casualty.
Both bearers move forward, carrying the casualty.MOVE A CASUALTY USING THE FOUR-HAND SEAT CARRY
The four-hand seat carry is used to carry a conscious casualty who can help support himself while he is being carried. This carry is especially useful in transporting a person with a head or foot injury for a moderate distance.
Both bearers position themselves behind the casualty.
Bearers face each other. Each bearer grasps his own left wrist with his right hand and grasps the other bearer\'s right wrist with his left hand. The bearer\'s forearms form the seat for the casualty.MOVE A CASUALTY USING THE FOUR-HAND SEAT CARRY
The casualty stands on his own or another soldier helps the casualty to a standing position.
Both bearers lower their bodies so the seat is about even with the casualty\'s knees.
The casualty sits on the bearers\' forearms and places his arms around the bearers\' shoulders for balance and support.
Both bearers stand erect in unison, lifting the casualty.
Both bearers move forward.TRANSPORT A CASUALTY USING A TWO-MAN CARRY OR AN IMPROVISED LITTER
CLOSING Helping to evacuate casualties from the battlefield is one of the functions of the combat lifesaver. You will probably be the most knowledgeable person in the litter squad and must be prepared to act as the leader of the squad.
Questions TRANSPORT A CASUALTY USING A ONE-MAN CARRY
INTRODUCTION One-man manual carries are used to move a casualty when the time or materials needed to make a litter are not available and/or other personnel are not available to assist you in moving the casualty. If the casualty is conscious, tell him what you are going to do and get him to help you as much as possible.
TRANSPORT A CASUALTY USING A ONE-MAN CARRY
TASK
Transport a casualty using an appropriate one-man carry.
CONDITIONS
Given a simulated casualty and an assistant.
STANDARD
Score a GO on the performance checklist.
CHOOSE AN APPROPRIATE ONE-MAN CARRY When choosing a one-man carry, consider the casualty\'s injuries, the military situation, the distance to be covered, the weight of the casualty, your strength and endurance, and obstacles to be encountered.
CHOOSE AN APPROPRIATE ONE-MAN CARRY
Fireman\'s Carry
Used to quickly move an unconscious or conscious casualty.
Can be used to move the casualty a moderate or long distance.
Leaves one of the bearer\'s arms free to carry a rifle, move around obstacles, etc.
CHOOSE AN APPROPRIATE ONE-MAN CARRY
Support Carry
Used only with a conscious casualty who can walk or at least hop on one leg.
Can be used to move a casualty a long distance or until the casualty tires.
Arms Carry
Used to move a conscious or unconscious casualty.
Used to move a casualty a short distance.
CHOOSE AN APPROPRIATE ONE-MAN CARRY
Saddleback Carry
Used only for a conscious casualty who can put his arm around your neck.
Can be used to move a casualty a moderate or long distance.
Pack-Strap Carry
Used for a conscious or unconscious casualty.
Can be used to move a casualty a moderate distance.
Not used if the casualty has a broken arm.
CHOOSE AN APPROPRIATE ONE-MAN CARRY
Pistol-Belt Carry
Used to carry a conscious or unconscious casualty.
Can be used to move a casualty a long distance.
Leaves both hands free to use your rifle, climb banks, or move over obstacles.
Pistol-Belt Drag
Used to move a conscious or unconscious casualty.
Used to move a casualty for a short distance.
Keeps rescuer and casualty closer to the ground than any other carry or drag.
CHOOSE AN APPROPRIATE ONE-MAN CARRY
Neck Drag
Used to move a conscious or unconscious casualty.
Used to move a casualty for a short distance.
Keeps rescuer close to the ground, but not as close as the pistol-belt drag.
Used when moving behind a low wall, under a vehicle, or through a culvert.
Not used if the casualty has a broken arm.
CHOOSE AN APPROPRIATE ONE-MAN CARRY
Cradle Drop Drag
Used to move a conscious or unconscious casualty.
Used to move a casualty up or down steps or low drops or to quickly move a casualty from a life-threatening situation.
TURN A CASUALTY
Some carries require the casualty to be in a prone position; others require him to be in a supine position.
Kneel at the casualty\'s uninjured side.
If you are in a chemical environment, squat--do not kneel.
Place the casualty\'s arms above his head and cross his far ankle over the near one.
Grasp the casualty\'s clothing at his far shoulder and hip and gently pull so the casualty rolls toward you. Continue until the casualty is turned (on his abdomen or back).
Place the casualty\'s arms at his side and straighten his legs.RAISE A CASUALTY TO A STANDING POSITION Some one-man carries requires the casualty be raised to a standing position. If the casualty is conscious, you may be able to assist him to stand up. If the casualty is unconscious, however, you need to raise him to a standing position without his help.
RAISE A CASUALTY TO A STANDING POSITION
Regular Method
Position the casualty in a prone position.
Straddle the casualty, slip your hands under his chest, and lock your hands together.
Lift the casualty and begin walking backward until he is on his knees.
Continue walking backward until his legs are straight and his knees are locked.
RAISE A CASUALTY TO A STANDING POSITION
Walk forward and bring the casualty to a standing position. Keep the casualty tilted slightly backward so his knees will remain locked. If his knees do not remain locked, walk backward until they lock and then move forward until the casualty is in the standing position.
Grasp one of the casualty\'s wrists and raise his arm. Use your other arm to hold the casualty erect.
RAISE A CASUALTY TO A STANDING POSITION
Move under the casualty\'s arm to his front, lower his arm, and put both of your arms around the casualty\'s waist to support the casualty. Interlock the fingers of your hands.
Place your foot between the casualty\'s feet and spread them so his feet are about six to eight inches apart.RAISE A CASUALTY TO A STANDING POSITION
Alternate Method
This method is used if it will be safer for the casualty due to his injuries.
Position the casualty in a prone position.
Kneel on one knee at the casualty\'s head, facing the casualty\'s feet.
If you are in a chemical environment, squat--do not kneel.
Put your hands under his armpits, down his sides, and across his back.RAISE A CASUALTY TO A STANDING POSITION
Rise, lifting the casualty to his knees. Keep the casualty\'s head from snapping back.
Lower your arms, secure a hold on the casualty, and raise him to a standing position with his knees locked.
Put your arms around the casualty\'s waist, interlock your fingers, and tilt his body slightly backward to keep his knees from buckling.
Place your foot between his feet and spread them so his feet are six to eight inches apart.
PERFORM THE FIREMAN\'S CARRY
Raise the casualty to a standing position.
Grasp the casualty\'s wrist and lift his arm over his head while continuing to support the casualty with your other arm.
If the casualty has an injured arm, grasp the wrist of the uninjured arm.
Bend at the waist and kneel, pulling the casualty over your shoulder. At the same time, slip your arm from his waist, pass the arm between the casualty\'s legs, and grasp behind the casualty\'s knee.
Move the hand grasping the casualty\'s wrist to the hand at the casualty\'s knee.PERFORM THE FIREMAN\'S CARRY
Grasp the casualty\'s wrist with the hand behind the casualty\'s knee, thus freeing the hand that previously held the wrist.
Place your free hand on your knee and push on your knee to slowly rise to a standing position. This will help to prevent back strain.
Adjust the casualty\'s body so his weight is distributed comfortably.
Move forward, carrying the casualty.PERFORM THE SUPPORT CARRY
Position the casualty in a sitting position.
Bend down at the casualty\'s side so you are facing in the same direction as the casualty.
If the casualty has an injured leg, position yourself with the injured leg next to you.
Bring the casualty\'s near arm over your shoulder and grasp his wrist with your hand that is away from the casualty.
Put your inside arm around the casualty\'s waist.
PERFORM THE SUPPORT CARRY
Stand up, helping the casualty to rise to a standing position also.
Assist the casualty to walk or hop on one leg.
Adjust your walking motion as needed to help the casualty maintain his balance.PERFORM THE ARMS CARRY
Raise the casualty to a standing position.
Slide one of your arms under the casualty\'s arm, behind his back, and under his other arm.
Move to the casualty\'s side, bend down, and place your other arm behind the casualty\'s knees.
Lift the casualty from the ground and stand erect.
Carry the casualty high on your chest to lessen fatigue.PERFORM THE SADDLEBACK CARRY
Raise casualty to a standing position or have the casualty stand up.
Grasp the casualty\'s wrist and lift his arm over his head while continuing to support the casualty with your other arm.
Turn so your back is to the casualty and bring his arm over your shoulder. Support the casualty\'s waist with your other arm, if needed.
Grasp the casualty\'s other wrist and lift his arm over your shoulder or have the casualty put his other arm around your neck.
PERFORM THE SADDLEBACK CARRY
Have him grasp one of his wrists with his other hand.
Stoop and move your arms around the outside of the casualty\'s thighs.
Bring your hands inside the casualty\'s thighs to your sides, lifting his thighs.
Stand up and clasp your hands together in front of you.
Adjust the casualty to make the weight distribution more comfortable.
Walk forward.PERFORM THE PACK-STRAP CARRY
Raise the casualty to a standing position.
Grasp one of the casualty\'s wrists and lift his arm above his head while continuing to support the casualty\'s waist with your other arm.
Turn so your back is to the casualty. Bring the casualty\'s raised arm over your shoulder as you turn.
Bend your knees somewhat so your shoulder fits under his arm.PERFORM THE PACK-STRAP CARRY
Release his waist, grasp his other wrist, and bring that arm over your other shoulder.
Hold both wrists so his hands are in a palms down (palms toward your body) position. Twisting his hands could result in injury to the casualty\'s joints when he is lifted and carried.
Bend forward and lift the casualty as high on your back as possible.
Walk forward, keeping bent so the casualty\'s weight is balanced on your back and his feet are not dragging.PERFORM THE PISTOL-BELT CARRY
Form a sling by joining two fully-extended pistol belts together to form one large loop. If pistol belts are not available, use material which will not break and which will not cut or bind the casualty, such as a rifle strap or cravat bandages.
Position the casualty on his back.
Slip the sling under the casualty so the top part of the loop is under his lower back, the bottom part of the loop is under his thighs, the belt buckles are centered behind the casualty, and a loop end extends from each side.PERFORM THE PISTOL-BELT CARRY
Move the casualty\'s legs apart and lie between them on your back.
Thrust your arms through the loop ends and fit the loop ends over your shoulders.
Grasp the casualty\'s wrist and his trouser leg on his injured side.
Roll toward the casualty\'s uninjured side and onto
your abdomen. (Both you and the casualty are now in a prone position.)
Release the casualty\'s wrist and leg and push yourself up until you are on your knees.
PERFORM THE PISTOL-BELT CARRY
Rise to a kneeling position and place your hand on your knee for support.
Rise to your feet. Lean forward to balance the casualty\'s weight.
Adjust the casualty\'s body so the weight is distributed comfortably.
Walk forward.
Your hands are free to carry a rifle, climb obstacles, etc.
If the casualty is conscious, have him put his arms around your neck.
If the casualty is unconscious and you do not have to carry anything in your hands, grasp his wrists (palms down) to help balance the casualty while you are walking.
PERFORM THE PISTOL-BELT DRAG
Extend two (or three) pistol belts to their full length and join them together to make one large loop. Other materials, such as a rifle sling or cravats, can be used if pistol belts are not available.
Position the casualty on his back.
Slip one end of the loop across the casualty\'s chest, under his armpits, and under his shoulders.
Twist the remainder of the loop above his head to form a figure 8. Adjust the belts so the buckles cross in the center of the figure 8.
PERFORM THE PISTOL-BELT DRAG
Lie on your side facing the casualty with your head in the same direction as the casualty\'s head. Support yourself on your elbow.
Slip the arm on which you are resting through the top loop of the figure 8 and bring the loop over your shoulder.
Turn onto your abdomen. The sling is now across and under your chest and the loop is on the shoulder away from the casualty.
Crawl, dragging the casualty with you.PERFORM THE NECK DRAG
Position the casualty on his back.
Tie the casualty\'s hands together with material which will not cut his wrists, such as a field dressing or a cravat. Do not tie the materials tight enough to interfere with the blood circulation.
If the casualty is conscious, tell him to interlock his fingers.
Face the casualty\'s head and straddle his hips on your knees.
Loop the casualty\'s arms around your neck.
Crawl forward on your hands and knees, dragging the casualty beneath.
Keep the casualty\'s head from dragging on the ground.PERFORM THE CRADLE DROP DRAG
Position the casualty on his back.
Kneel at the casualty\'s head.
Slide your hands (palms up) under his shoulders and grasp the clothing under his armpits.
Partially rise, pulling the casualty to a semi-sitting position.
Support his head on one of your arms.
If possible, bring your elbows together and use both forearms to support the head.
Rise to a stooped position.
Walk backward, dragging the soldier backward.
If you go down steps, let his hips and legs drop from step to step.
TRANSPORT A CASUALTY USING A ONE-MAN CARRY
CLOSING One man carries are used to quickly remove a casualty from a source of danger, such as a burning building or enemy fire. They are also used to evacuate a casualty when other methods are not available. Being able to perform the carries rapidly and properly will help to get both the casualty and yourself to a place of safety quickly.
Questions OVERVIEW of CLS TASKS and EQUIPMENT
INTRODUCTION You have already been tested on your ability to perform the buddy-aid tasks which every soldier is expected to know and perform. The tasks you will now learn are tasks normally performed by the 91B combat medic. The most important task you will learn is to initiate an intravenous infusion. Initiating an intravenous infusion will help to control shock caused by blood loss, severe burns, or severe heat injury.OVERVIEW of CLS TASKS and EQUIPMENT
TASK
Identify the functions of the combat lifesaver and the contents of the combat lifesaver aid bag.
CONDITIONS
Given written items pertaining to the role of the combat lifesaver and to the combat lifesaver aid bag.
STANDARD
Score 70 or more points on the 100-point written examination.
IDENTIFY THE PURPOSE OF THE COMBAT LIFESAVER
The Army doctrine was developed to be used on a battlefield in which combat elements are widely dispersed. This will create a problem for the Army Medical Department as well as the rest of the Army.
Since the combat elements will be spread out and constantly on the move, it will be difficult for medical personnel such as the combat medic to quickly reach battlefield casualties.
Part of the doctrine calls for regular, nonmedical soldiers to be given training in providing additional emergency care to wounded soldiers.
IDENTIFY THE PURPOSE OF THE COMBAT LIFESAVER
This care will help a wounded soldier to survive those first few crucial minutes after he is wounded and help stabilize the soldier until he can be treated by trained medical personnel. The name given to this nonmedical provider of far-forward emergency care is the combat lifesaver.
Remember, as a combat lifesaver, your primary function is to accomplish your combat mission. You are to provide emergency care as a secondary mission when your primary mission allows. You may also be asked to assist the combat medic in providing care and preparing casualties for evacuation when you have no combat duties to perform.
IDENTIFY THE PURPOSE OF THE COMBAT LIFESAVER
Normally, each squad, team, crew, or equivalent-sized unit will have at least one member trained to function as a combat lifesaver.
IDENTIFY TASKS PERFORMED BY THE COMBAT LIFESAVER Combat lifesaver training is a bridge between the self-aid/buddy-aid training given all soldiers during basic training and the medical training given to the combat medic.
IDENTIFY TASKS PERFORMED BY THE COMBAT LIFESAVER
In addition to being proficient in all self-aid/buddy-aid tasks, the combat lifesaver performs the following tasks:
Initiate an intravenous infusion.
Measure and monitor a casualty\'s pulse.
Measure and monitor a casualty\'s respirations.
Apply a SAM splint to a fractured limb.
Insert an oropharyngeal airway in an unconscious casualty.
Manage battle fatigue.
IDENTIFY TASKS PERFORMED BY THE COMBAT LIFESAVER
CLS tasks (cont):
Identify and treat cold injuries in addition to frostbite.
Administer first aid to blister, choking, and blood agent casualties and provide additional treatment to nerve agent casualties.
Administer over-the-counter pain killers (such as Tylenol®) and antihistamine tablets (such as Sudafed®).
Transport a casualty using various litter carries.
Load casualties onto military vehicles.
IDENTIFY MEDICAL SUPPLIES CARRIED BY THE COMBAT LIFESAVER The combat lifesaver carries a small aid bag containing his medical supplies. The aid bag weighs a little over nine pounds and takes up about 0.44 cubic feet. The aid bag consists of the following items:
IDENTIFY MEDICAL SUPPLIES CARRIED BY THE COMBAT LIFESAVER
Two bottles containing 50 acetaminophen tablets (such as Tylenol). Administered for headache, common cold, and minor pain.
One roll of adhesive tape. Used to secure the I.V. catheter and tubing to the casualty\'s arm.
Two rubber artificial airways. Used to keep the airway of an unconscious casualty open.
Five atropine autoinjectors. Used to administer additional antidote to nerve agent casualties.
IDENTIFY MEDICAL SUPPLIES CARRIED BY THE COMBAT LIFESAVER
Eighteen self-adhesive bandages with attached sterile pad. Used to protect minor wounds.
What is usually called an \"ace\" bandage is a gauze elastic kling bandage. While the combat lifesaver does not bandage sprains, this bandage can be useful as a reinforcement bandage and as padding for a splint.
Four muslin bandages. Used to secure splints and used as tourniquet bands, slings, and swathes.
IDENTIFY MEDICAL SUPPLIES CARRIED BY THE COMBAT LIFESAVER
Nylon case. Used to carry the medical supplies. The case has three zippered compartments for storing supplies and a shoulder strap.
Two catheter and needle units. Used in administering intravenous infusion.
Five CANA autoinjectors. Used to alleviate convulsions in nerve agent casualties.
Six field first-aid dressings. Used to control bleeding and protect wounds.
IDENTIFY MEDICAL SUPPLIES CARRIED BY THE COMBAT LIFESAVER
Three pairs of rubber sterile patient examining gloves. Used when initiating I.V.s for the protection of both casualty and combat lifesaver.
Two intravenous injection sets. Connects the I.V. bag to the needle and catheter unit. The clamp controls the rate at which the fluid flows from the bag.
Six packets of povidone-iodine impregnated cotton pads. Used to cleanse skin, especially before performing the I.V. puncture.
IDENTIFY MEDICAL SUPPLIES CARRIED BY THE COMBAT LIFESAVER
Eight packets of povidone-iodine ointment. Used to protect minor wounds from infection.
One bottle containing 24 pseudoephedrine hydrochloride tablets (such as Sudafed®). Administered for allergies.
Two I.V. bags. Each bag contains slightly more than a pint of sterile fluid to be administered intravenously to avoid hypovolemic shock.IDENTIFY MEDICAL SUPPLIES CARRIED BY THE COMBAT LIFESAVER
One pair of scissors. Used to cut the casualty\'s clothing to expose wounds, cut muslin bandages into triangular bandages, and cut tape.
One SAM splint. Used in splinting fractured limbs.
Fourteen inches of rubber tourniquet (flat). Used as a constricting band when performing the I.V. task.
OVERVIEW of CLS TASKS and EQUIPMENT
CLOSING Remember, the combat lifesaver performs emergency care as a secondary mission only when his primary combat mission allows. This is tested in the written multiple-choice examination.
Questions INITIATE AN INTRAVENOUS INFUSION
INTRODUCTION Hypovolemic shock is a condition caused by a sudden decrease in the volume of fluid in the body\'s blood circulatory system. This condition can be fatal. The combat lifesaver must be prepared to initiate an intravenous infusion (I.V.) to add fluid to the casualty\'s circulatory system. The sooner the casualty receives I.V. fluids, the more rapid the improvements in his condition.
INITIATE AN INTRAVENOUS INFUSION
TASK
Initiate an intravenous infusion (I.V.).
CONDITIONS
Given needed supplies and a simulated casualty.
STANDARD
Score a GO on the performance checklist.IDENTIFY SIGNS AND SYMPTOMS OF HYPOVOLEMIC SHOCK
Causes of Hypovolemic Shock
Hypovolemic shock is caused by a loss of fluid or blood from the casualty\'s circulatory system. It is usually caused by rapid or severe bleeding or by serious (second and third degree) burns over at least 20 percent of the body. Excessive fluid loss can also result from vomiting, diarrhea, or heat injuries such as profuse sweating and dehydration.
IDENTIFY SIGNS AND SYMPTOMS OF HYPOVOLEMIC SHOCK
Signs and Symptoms of Hypovolemic Shock
Severe bleeding from wounds or large burned areas on skin.
Anxiety.
Changes in level of consciousness, such as going from alert to semiconscious or unconscious. If possible, record the casualty\'s AVPU: Alert, Verbally responsive, Painful response, Unresponsive.
IDENTIFY SIGNS AND SYMPTOMS OF HYPOVOLEMIC SHOCK
Mental confusion.
Ask casualty questions that cannot be answered by a simple yes or no, such as, \"What is your name? What is the month? What day of the week is it? Where are we?\"
Restlessness and agitation.
Irregular or fluctuating pulse in early stages, weak and rapid pulse in later stages.
Cool, clammy skin.
Change in skin color (from normal to pale, bluish, or grayish tint).
IDENTIFY SIGNS AND SYMPTOMS OF HYPOVOLEMIC SHOCK
Dilated pupils, nonreactive to light.
Rapid, shallow breathing.
Thirst, dry mouth.
Nausea or vomiting.
Pulse rate over 100.
PERFORM PRELIMINARY MEASURES TO TREAT A CASUALTY FOR HYPOVOLEMIC SHOCK
Check the casualty for breathing. Take measures to restore breathing (mouth-to-mouth resuscitation, etc.) if needed. If the casualty is unconscious, monitor the casualty\'s breathing and perform mouth-to-mouth resuscitation if the casualty stops breathing.
Control major bleeding (field dressing, pressure dressing, and/or tourniquet as needed).
Dress and seal open chest wounds.
Dress open abdominal wounds and open head wounds.
PERFORM PRELIMINARY MEASURES TO TREAT A CASUALTY FOR HYPOVOLEMIC SHOCK
Position the casualty on his back and place a log or folded jacket under his feet with his feet above the level of his heart.
PERFORM PRELIMINARY MEASURES TO TREAT A CASUALTY FOR HYPOVOLEMIC SHOCK
Question:
When would you not elevate the casualty\'s feet?
Response:
When the casualty has a suspected fracture of the thigh, leg, or ankle (unless the fracture has already been splinted).
When he has an open abdominal wound (casualty should be placed in flexed-knee position instead).
When he has an open chest wound (position casualty on injured side).
When he has an open head wound (have casualty sit up or lie on side with wound away from ground).
PERFORM PRELIMINARY MEASURES TO TREAT A CASUALTY FOR HYPOVOLEMIC SHOCK
Loosen the casualty\'s clothing (tight clothing may interfere with circulation).
Clothing is not loosened in a chemical environment.
Start an intravenous infusion.
Keep the casualty from getting too warm or too cool.
Monitor his breathing and pulse.
PUT ON GLOVES
Question:
Why would you put on gloves before starting an I.V.?
Response:
It will reduce the chance of infection resulting from the I.V. puncture.
Question:
What would you do if you were in the field and could not put on gloves before starting the I.V.?
Response:
Start the I.V. anyway.
GATHER AND CHECK I.V. SUPPLIES
Identify I.V. Supplies.
2 bags of I.V. fluid.
2 intravenous injection sets.
2 catheter and needle units.
Constricting band.
Antimicrobial pads.
Scissors.
Adhesive tape.
Adhesive bandages.
Antimicrobial ointment (if used).
GATHER AND CHECK I.V. SUPPLIES
Check the I.V. Set, Catheter/Needle, and I.V. Bag
Check the I.V. set box and the catheter/needle protective packaging for tears and water marks.
Discard if no longer sterile.
Tear the protective bag and remove the actual I.V. bag.
Check the bag for clarity of fluid and leaks.
Discard if the expiration date has passed, if the inner bag has a leak, or if the fluid is discolored or has sedimentation.
Remove the I.V. set from the box. Discard the set if the tubing is cracked or discolored.PREPARE THE I.V.
Identify the outlet port and expiration date on the I.V. bag; the spike, drip chamber, clamp, tubing, and adapter on the I.V. set; and the flash chamber, hub, catheter, and needle on the catheter/needle unit.
Remove the I.V. set from its protective bag.
Loosen the clamp (if needed); slip the clamp along the tubing until there is 6 to 8 inches of tubing between the clamp and the drip chamber; then tighten the clamp.
PREPARE THE I.V.
Remove protective covering from the I.V. fluid bag\'s outlet port without touching the end of the port.
Remove protective cap from spike on infusion set with a twisting motion. Do not touch the end of the spike.
Insert spike into the exposed I.V. outlet port with a twisting motion so the spike breaks the seal in the outlet port. Do not touch the end of the port or spike.
Hang bag on a stand or other object or hold bag up.
Squeeze the drip chamber until the drip chamber is half full of fluid.
PREPARE THE I.V.
Question:
What could happen if you do not remove the air from the tubing?
Response:
Air could be forced into the casualty\'s circulatory system. The air bubble (air embolism) could cause the casualty\'s heart to stop beating (cardiac arrest).
PREPARE THE I.V.
Remove air from the tubing of the I.V. set.
Hold the tubing above the bottom of the bag.
Loosen the clamp on the tubing.
Loosen or remove the protective cap over the adapter.
Gradually lower the tubing until the fluid reaches the end of the adapter.
Tighten the clamp fully and replace the protective cap over the adapter.
Protect tubing from becoming contaminated.
Loop tubing over I.V. stand or other object from which bag is hung, if applicable. The bag can also be placed on casualty\'s chest or under casualty\'s lower back.
Tear or cut 4 strips (about 4-inches in length) from the roll of tape and hang the strips on the I.V. bag.SELECT AND PREPARE AN INFUSION SITE
Position the casualty with his palm upward.
Select two possible sites.
Question:
I have found two possible injections sites where the vein is straight, springy and does not roll. Which site should I use for my first attempt?
Response:
The more distal site (closest to the hand, farthest from the heart).SELECT AND PREPARE AN INFUSION SITE
Place the constricting band around the casualty\'s arm 6 to 8 inches above the selected (distal) infusion site.
Stretch the band slightly.
Wrap the band around the arm so one end is longer than the other.
Secure the band by looping the longer end and drawing the shorter end over the loop and under the tubing. This allows the band to be released using only one hand. Be sure the tails point away from the infusion site.SELECT AND PREPARE AN INFUSION SITE
Tell the casualty, if conscious, to clench and relax his fist several times and then to keep his fist clenched. If unconscious, place the limb below the level of the heart.
Palpate (feel) the vein with your fingertips again.
Open a packet containing a povidone-iodine impregnated cotton pad and remove the pad.
Cleanse the skin at the site with the pad beginning at the site and spiraling outwards.INITIATE INFUSION
Open the protective packaging of the catheter/needle unit.
Remove the unit from its protective packaging.
Grasp the stem (connected to the needle) with your dominant hand and the protective cap from the catheter/needle with your nondominant hand.
Remove the cap from the catheter/needle unit and discard the protective cap.
Hold the catheter/needle with the bevel of the needle up.INITIATE INFUSION
Place the thumb of your nondominant hand about 1 inch below the injection site and over the vein.
Press on the skin to make the skin over the injection site taut.
Position the needle slightly to the side of the vein at approximately a 20 degree to 30 degree angle to the surface of the skin with the bevel up.
Insert the bevel into the skin.
Lower the angle of the needle until it is almost parallel to the skin surface.INITIATE INFUSION
Insert the needle into the vein (a slight \"give\" may be felt) and hold the needle steady.
Look at the flash chamber and check for blood in the flash chamber.
Question:
On the battlefield, what should you do if you try to start an I.V. on a casualty two times and both tries are unsuccessful?
Response:
Evacuate the casualty.
INITIATE INFUSION
Once blood is seen in the flash chamber, advance the catheter/needle unit about 1/8 of an inch farther to ensure that the catheter itself is in the vein.
Continue to hold the flash chamber with your dominant hand. Grasp the catheter hub with your other hand and thread the rest of the catheter (not the needle) into the vein (to the hub). Never reinsert the needle back into the catheter.
While holding the catheter hub with the nondominant hand, use a finger on that hand to press lightly on the skin over the catheter tip.
INITIATE INFUSION
Remove the flash chamber and needle from the catheter with your dominant hand and lay the flash chamber and needle to one side.
Tell the casualty to unclench his fist.
Remove the constricting tubing. The constricting band should have been in place for less than two minutes.
Grasp the adapter end of the I.V. tubing with your dominant hand.
Remove the protective cap from the adapter.
Quickly insert the tip of the adapter tightly into the hub of the catheter.
INITIATE INFUSION
Lift your finger from over the tip of the catheter.
Loosen the clamp on the tubing.
Check the drip chamber to make sure fluid is flowing.
Adjust the clamp so the fluid is flowing fast, but the fluid is seen as individual drops rather than as a steady stream of water.
Question:
Suppose the casualty has a head injury. What would you do differently?
Response:
Adjust the clamp so the fluid is flowing at about 10 drops per minute.
INITIATE INFUSION
Check the infusion site for infiltration (fluid leaking into surrounding tissue instead of entering the vein).
The infusion site is swollen, red, and cool to the touch.
The casualty has greater pain than expected.
Clear fluid is leaking from the site.
Question:
What would you do if the infusion site was infiltrated?
Response:
Discontinue the I.V. and start another I.V. using a new needle at a site above the old (infiltrated) site.
SECURE THE I.V
Remove one tape strip from the bag and place diagonally across the catheter hub. Continue to keep the adapter and hub in place.
Remove a second strip and place across the hub forming an “X”.
Remove the third strip of tape and place it across the adapter. The adapter and catheter are now secure.
Make a safety loop with the tubing. Secure the loop with the last piece of tape. The loop helps to prevent the catheter from being dislodged if the tubing is accidentally pulled.SECURE THE I.V.
Position the I.V. bag so fluid will flow from the bag, through the drip chamber and tubing, and into the casualty\'s vein.
If possible, hold the bag up or hang it from a limb or other object that is higher than the casualty\'s heart. Gravity will cause the fluid to flow.
If the bag cannot be hung or held, place the bag under casualty\'s lower back. The pressure from the body will force fluid out of the bag.
SECURE THE I.V.
Question:
What else can you do to control shock?
Response:
Cover the casualty with a blanket or poncho if the weather is cool; shade casualty and remove excess clothing if it is hot. Continue to monitor the casualty\'s respirations and pulse.
REMOVE THE CATHETER
Tighten the clamp on the tubing to stop the flow of fluid.
Loosen and remove the tape from the loop of I.V. tubing. Start at the ends of tape and loosen toward the middle.
Loosen and remove the strip of tape securing the adapter.
Loosen and remove the two strips of tape securing the catheter hub.
REMOVE THE CATHETER
Remove the catheter from the vein by pulling it out at an angle almost parallel to the skin (the same angle used in inserting the needle).
If desired, povidone-iodine antimicrobial ointment can be applied to the puncture site to help to protect the puncture wound from infection.
Cover the puncture site with an adhesive bandage. Explain that covering the site with an adhesive bandage will help to stop bleeding and prevent the puncture wound from becoming contaminated.
INITIATE AN INTRAVENOUS INFUSION
CLOSING Remember, the basic treatment procedures for treating a casualty are: make sure the casualty is breathing adequately, control serious bleeding, and control shock.
If a casualty has lost a good deal of blood, the most important procedure other than promptly controlling the bleeding is to initiate an I.V. to control hypovolemic shock.
INITIATE AN INTRAVENOUS INFUSION
CLOSING (cont) The quicker the casualty receives intravenous fluids, the better his chances for surviving. An I.V. can be maintained while the casualty is being evacuated. If a medic arrives before the casualty is evacuated, he can maintain the I.V. and administer additional fluids using the same catheter and tubing. Initiating an I.V. is probably the most challenging task in your Combat Lifesaver training.
Questions MEASURE AND MONITOR A CASUALTY\'S PULSE
INTRODUCTION
When you evaluate a casualty, you may need to take his pulse. Taking the casualty\'s pulse is an important step in identifying hypovolemic shock and in determining if additional antidote is to be administered to nerve agent casualties. In this , you will learn to determine the number of pulse beats per minute and identify if the casualty\'s pulse rate, strength, and rhythm are normal or abnormal. By evaluating the casualty\'s pulse, you are really evaluating the effectiveness of the casualty\'s heart action.
MEASURE AND MONITOR A CASUALTY\'S PULSE
TASK
Determine a casualty\'s pulse rate and describe the characteristics of the pulse.
CONDITIONS
Given a simulated casualty and a timepiece with a second hand.
STANDARDS
Score a GO on the performance checklist.
LOCATE THE PULSE SITE
When the heart pumps and forces blood into the arteries, the surge of blood creates a wave-like effect which can be felt by pressing gently on an artery. This effect is called the pulse. It is usually easier to feel the pulse if the artery is on top of a bony area such as the wrist or ankle or if the artery can be pressed against a fairly rigid structure such as the trachea in the neck.LOCATE THE PULSE SITE
Carotid Pulse
A common location for taking the pulse is the neck. There are two large arteries near the front of the throat which supply the head with blood. These arteries are called the carotid arteries.
One artery is located in a groove on the right side of the larynx and the other artery is located in a groove on the left side of the larynx. The artery on the casualty\'s left side is the left carotid artery and the artery on the casualty\'s right side is the right carotid artery. Either artery can be used to take the casualty\'s carotid pulse.
LOCATE THE PULSE SITE
To locate the artery, place the middle and index fingers on the casualty\'s larynx, which is usually called the Adam\'s apple.
Move the fingers to the side until you feel the groove created by the muscles next to the trachea.
Press on the groove until you feel the pulse.
Question:
Why don\'t you use your thumb when taking a casualty\'s pulse?
Response:
The thumb has a pulse of its own. You may be taking your pulse instead of the casualty\'s pulse.
LOCATE THE PULSE SITE
Radial Pulse
Another common location for taking the pulse is the wrist. When taking the pulse at the wrist, gently press the radial artery against the bones of the wrist. The radial pulse is taken on the inside of the wrist near the base of the thumb. Do not use the back of the wrist. Either wrist can be used to take the casualty\'s radial pulse.LOCATE THE PULSE SITE
Question:
When would you need to take a casualty\'s radial pulse?
Response:
You have applied a splint to a fractured arm and want to check the casualty\'s blood circulation below the splint.
LOCATE THE PULSE SITE
Posterior Tibial Pulse
A less common location for taking the pulse is the ankle. When taking the pulse at the ankle, gently press the posterior tibial artery against the bones of the ankle. The pulse is taken on the inside of the ankle behind the large ankle bone. The pulse can be found using either ankle.LOCATE THE PULSE SITE
Question:
When would you need to take a casualty\'s posterior tibial pulse?
Response:
You have applied a splint to a fractured leg and want to check the casualty\'s blood circulation below the splint.
LOCATE THE PULSE SITE
Other Pulse Sites
The temporal pulse is felt at the temple near the ear.
The brachial pulse is felt on the inside of the elbow.
The femoral pulse is felt in the groin area.
The popliteal pulse is felt behind the knee.
The dorsalis pedis pulse is felt on top of the foot.
A pulse may also be felt directly over the heart on the left side of the casualty\'s chest. This pulse is called the apical pulse.TAKE THE CASUALTY\'S PULSE
Changes in the casualty\'s pulse rate and in the strength of the pulse beats indicate changes in the beating of the casualty\'s heart.
Palpate the Pulse Site
Place the tips of your index and middle fingers over the pulse site and press gently.
Count the Pulse Beats for One Minute
Using a clock with a second hand, count the pulse for one full minute.TAKE THE CASUALTY\'S PULSE
A normal pulse rate for an adult when resting is between 60 to 80 beats per minute. The average is 72 beats per minute.
A resting pulse rate of more than 80 beats per minute is a higher than normal pulse rate. This can be caused by shock, bleeding, heat, dehydration, fever, pain, emotions, and vigorous activity (such as running).
TAKE THE CASUALTY\'S PULSE
Tachycardia is an abnormal condition that exists when the casualty\'s pulse rate is over 100 beats per minute.
A resting pulse rate of less than 60 beats per minute is a lower than normal pulse rate which can be caused by heart disease and medications.
A pulse rate below 60 may also occur in a soldier who is physically fit.
A pulse rate of less than 50 beats per minute is called bradycardia.
TAKE THE CASUALTY\'S PULSE
Classify the Strength of the Pulse
Regular -- Pulse is easy to feel and has even beats of good force.
Bounding -- Pulse is easily detected due to the exceptionally large amount of blood being pumped with each heartbeat.
Weak -- Pulse is difficult to detect due to a decreased amount of blood flowing through the arteries, usually due to bleeding or shock.
Absent -- Pulse cannot be detected, usually due to a blocked or injured artery or due to a lack of heart action.
TAKE THE CASUALTY\'S PULSE
Question:
At which pulse site will you probably feel the most distinct pulse?
Response:
The carotid pulse site.
MONITOR THE CASUALTY\'S PULSE If you remain with the casualty for a significant amount of time, take the casualty\'s pulse periodically and note any significant changes in rate, rhythm, or strength of the casualty\'s pulse. Remember that an irregular or fluctuating pulse may indicate an early stage of hypovolemic shock and a weak and rapid pulse may indicate a more advanced stage of hypovolemic shock.
MEASURE AND MONITOR A CASUALTY\'S PULSE
CLOSING Taking a casualty\'s pulse is important in identifying shock and in evaluating a nerve agent casualty, which we will discuss shortly. In a chemical environment, you will need to count a chemical agent casualty\'s carotid pulse rate while wearing your protective gloves.
Questions MEASURE AND MONITOR A CASUALTY\'S RESPIRATIONS
INTRODUCTION
Another term for breathing is respiration. It is the process of filling the lungs with fresh air, then expelling the air. While the air is in the lungs, some of the oxygen is removed from the air. The body uses the oxygen to obtain energy from the food we eat. This process, however, produces a gaseous by-product called carbon dioxide.
MEASURE AND MONITOR A CASUALTY\'S RESPIRATIONS
INTRODUCTION (cont) The body must get rid of this waste product. When oxygen is removed from the air in the lungs, it is replaced with carbon dioxide. In this way, oxygen is inhaled and carbon dioxide is exhaled. Normal breathing is easy and does not require effort. An unusually high or low breathing rate or difficulty in breathing usually indicates that the casualty has a problem requiring attention.
MEASURE AND MONITOR A CASUALTY\'S RESPIRATIONS
TASK
Determine a casualty\'s respiration rate and describe characteristics of the respirations.
CONDITIONS
Given a simulated casualty and a timepiece with a second hand.
STANDARDS
Score a GO on the performance checklist.
COUNT THE CASUALTY\'S RESPIRATIONS
You must carefully observe the casualty\'s chest for one full minute in order to determine his respiration rate. One respiration consists of one inhalation where the chest rises and one exhalation where the chest falls. You will get a more reliable count if the casualty is not aware that you are counting his respirations. If his attention is focused on his own breathing, he may change the rate, depth, and rhythm of his respirations. If you are monitoring a casualty, observe his respirations immediately after you check his pulse without letting the casualty know that you are through taking his pulse and are actually observing the rise and fall of his chest.
COUNT THE CASUALTY\'S RESPIRATIONS
Have the casualty lie on his back.
Take the casualty\'s radial pulse for one full minute.
Without changing position, begin counting his respirations out loud.
Begin the time when the casualty begins to inhale. Do not count the respiration until the casualty has exhaled.
Count the casualty\'s respirations for one full minute.
COUNT THE CASUALTY\'S RESPIRATIONS
Question:
I started timing the respirations when the casualty began to inhale. I counted the respirations when he completed the exhalation. Suppose he was just completing an inhalation when the 60 seconds ended. Would I count the inhalation as a respiration?
Response:
No. The casualty must complete both an inhalation and an exhalation before it is counted.
LOOK FOR CHARACTERISTICS OF NORMAL AND ABNORMAL RESPIRATION
The normal range of respiration rates in an adult when resting is 12 to 20 respirations per minute.
A breathing rate that is slower than 12 respirations per minute or faster than 20 respirations per minute may indicate a problem affecting the casualty\'s ability to get and absorb oxygen.
A respiration rate below 12 respirations per minute is called slow.
A respiration rate above 20 respirations per minute is called rapid.
LOOK FOR CHARACTERISTICS OF NORMAL AND ABNORMAL RESPIRATION
Normal respiration are deep and even. The rib cage expands fully. Contraction and relaxation of the diaphragm can be detected by observing the casualty\'s abdomen.
In shallow breathing, the chest and abdomen move very little.
A pattern of shallow, slow respirations is called hypoventilation.
A pattern of rapid, deep respirations is called hyperventilation.
LOOK FOR CHARACTERISTICS OF NORMAL AND ABNORMAL RESPIRATION
If the respirations are shallow and rapid, the casualty is said to be short of breath. Irregular breathing rhythm, labored breathing, and noises (such as wheezing) produced during breathing may indicate the presence of injury or illness.
Question:
What medical term is used to describe difficulty in breathing?
Response:
Dyspnea.
MONITOR THE CASUALTY\'S RESPIRATIONS
If you remain with the casualty, you must monitor his breathing. If his breathing stops and you are not in a chemical environment, you must administer mouth-to-mouth or mouth-to-nose resuscitation. Even if his breathing does not stop, changes in respiration rate, depth, and regularity may indicate that his condition is improving or becomes worse. Report abnormalities and changes to medical personnel.
MEASURE AND MONITOR A CASUALTY\'S RESPIRATIONS
CLOSING Normal breathing should be effortless and even in rhythm, and should not produce noise or discomfort. Any change from normal breathing can be a warning sign that the casualty is in trouble.Questions APPLY A SAM SPLINT TO A FRACTURED LIMB
INTRODUCTION
You have already completed a performance examination on splinting a fractured limb using an improvised splint. Your combat lifesaver aid bag contains a rolled up splint, called the SAM splint, which can be used to immobilize certain fractures. The splint is also referred to as the universal splint or splint, aluminum, malleable. The splint is made of aluminum with a foam covering which serves as padding. In this , you will practice applying this splint.
APPLY A SAM SPLINT TO A FRACTURED LIMB
TASK
Apply a SAM splint to a fractured limb.
CONDITIONS
Given a simulated casualty with a fractured limb and a SAM splint.
STANDARDS
Score a GO on the performance checklist.
PREPARE THE CASUALTY FOR APPLICATION OF THE SPLINT
Question:
If your evaluation indicates that the casualty has a fractured forearm and you have already exposed the fracture site. What do you need to do before splinting the limb?
Response:
Take the casualty\'s pulse below the fracture site. Check for a pulse below the fracture site.
PREPARE THE CASUALTY FOR APPLICATION OF THE SPLINT
Question:
What would you do if no pulse is present?
Response:
Splint the limb and evacuate the casualty as soon as possible.
Question:
If you found a pulse and the forearm looks deformed. Should you straighten the forearm before you splint it?
Response:
No.
APPLY THE SAM SPLINT TO A FRACTURE of the FOREARM, WRIST, LOWER LEG, OR ANKLE
Fractured Forearm or Wrist
Unroll the SAM splint and flatten it.
Fold the SAM splint in half so it is a tall V-shape.
Bend the edges of the splint in until the shape of the splint generally conforms to the curve and shape of the limb being splinted. (Each half of the splint will have a U-shape.) Bending the edges also increases the rigidity of the SAM splint.
Prepare cravats from muslin bandages to be used in securing the splint.
APPLY THE SAM SPLINT TO A FRACTURE of the FOREARM, WRIST, LOWER LEG, OR ANKLE
Question:
If muslin bandages are not available, what could you use as securing material.
Response:
Strips of cloth from a blanket or clothing or the tape from the aid bag.
Apply the SAM splint to the forearm so the bend is at the elbow and the fracture is between the two sides of the splint. Adjust the shape of the SAM splint to conform to the limb, if needed.APPLY THE SAM SPLINT TO A FRACTURE of the FOREARM, WRIST, LOWER LEG, OR ANKLE
Question:
I am going to secure the SAM splint using these cravats. Where should I apply the cravats?
Response:
At least one cravat above the fracture site and at least one below the fracture site.
Secure the splint using at least two cravats.
Secure the splint above the fracture site and below the fracture site.APPLY THE SAM SPLINT TO A FRACTURE of the FOREARM, WRIST, LOWER LEG, OR ANKLE
Question:
Should I also apply a cravat over the fracture site?
Response:
No.
Tie the tails of the cravats in a nonslip knot on the outside of the splint. Tuck the ends of the tails into the cravat to prevent accidental entanglement when the casualty is moved.
APPLY THE SAM SPLINT TO A FRACTURE of the FOREARM, WRIST, LOWER LEG, OR ANKLE
Check the casualty\'s pulse below the most distal cravat. Loosen the cravats and reapply the splint, if needed. Periodically check distal pulse to ensure that swelling has not compromised the pulse.
Quickly apply a sling and swathe to further immobilize the fracture.
APPLY THE SAM SPLINT TO A FRACTURE of the FOREARM, WRIST, LOWER LEG, OR ANKLE
Fractured Lower Leg or Ankle
Quickly shape the splint.
Check the casualty\'s pulse below the fracture site. Loosen footgear, if needed. Apply the splint to the casualty\'s lower leg with the bend on the bottom of the footgear.
Secure the splint with cravats.
Recheck the casualty\'s pulse.APPLY THE SAM SPLINT TO A FRACTURE of the UPPER ARM (HUMERUS)
Fold the SAM splint into an irregular (uneven) V-shape so one side of the V is about 4 to 6 inches shorter than the other.
Bend the edges of the splint so the sides of the splint are U-shaped and generally conform to the shape of the limb being splinted.
Prepare the cravats.
Apply the SAM splint to the fractured limb so the short side is in the casualty\'s armpit (but not pressing on the armpit), the long side extends to the shoulder, and the upper arm is between the two sides of the splint.
APPLY THE SAM SPLINT TO A FRACTURE of the UPPER ARM (HUMERUS)
Adjust the shape of the SAM splint to conform to the limb, if needed.
Secure the splint using at least two cravats.
Secure the splint above the fracture site and below the fracture site. Do not apply a cravat directly over the fracture site.
Tie the tails of the cravats in a nonslip knot on the outside of the splint and tuck in the tails.
CHECK THE CASUALTY
Question:
What should I do after I have secured the splint?
Response:
Check the casualty\'s circulation.Check the casualty\'s pulse below the most distal cravat.
CHECK THE CASUALTY
Question:
What should you do if you felt a pulse before applying the splint, but not after applying the splint?
Response:
Loosen the cravats, make sure the end of the splint is not pressing into the armpit, and retie the cravats.
Question:
What should you do if the casualty does not have a pulse below the fracture even after you reapply the splint?
Response:
Evacuate the casualty as soon as possible.
CHECK THE CASUALTY
Question:
What else can you do to immobilize the fracture?
Response:
Apply a sling and swathe. Quickly apply a sling and swathe to further immobilize the fracture.
APPLY A SAM SPLINT TO A FRACTURED LIMB
CLOSING
The SAM splint provides you with a prepadded rigid object from which a splint can be made. It is especially useful when other rigid objects cannot be obtained easily.
Questions INSERT AN OROPHARYNGEAL AIRWAY IN AN UNCONSCIOUS CASUALTY
INTRODUCTION You have already been tested on your ability to open a casualty\'s airway and administer mouth-to-mouth resuscitation. Part of the task requires you to keep the casualty\'s airway open while you treat other injuries. This may be a problem in an unconscious casualty. You can use one of the oropharyngeal airways in your aid bag to help keep the unconscious casualty\'s airway open while you check for injuries.
INSERT AN OROPHARYNGEAL AIRWAY IN AN UNCONSCIOUS CASUALTY
TASK
Identify procedures for inserting an oropharyngeal airway in an unconscious casualty.
CONDITIONS
Given written items pertaining to the oropharyngeal airway (J-tube) and its use.
STANDARD
Score 70 or more points on the 100-point written examination.
IDENTIFY WHEN THE OROPHARYNGEAL AIRWAY IS USED
The oropharyngeal airway is only used with an unconscious casualty.
Do not insert the oropharyngeal airway if the casualty is conscious or semiconscious. The airway could cause the casualty to gag and vomit.
Question:
Why would it be dangerous for the casualty to vomit?
Response:
The casualty could inhale some of the vomit which could then obstruct his airway.DETERMINE WHICH OROPHARYNGEAL AIRWAY IS THE APPROPRIATE SIZE
Place the oropharyngeal airway along the outside of the casualty\'s jaw with one end of the airway at the bottom tip of the casualty\'s ear.
Close the casualty\'s mouth and bring the other tip of the airway toward the corner of the casualty\'s mouth.
The airway should reach from the bottom tip of his ear to the corner of his mouth.
Repeat the steps using the other oropharyngeal airway and choose the one that is nearest the correct size.
DETERMINE WHICH OROPHARYNGEAL AIRWAY IS THE APPROPRIATE SIZE
Question:
Why is it important that the airway be of the appropriate size?
Response:
If the airway is not the correct size, it could injure the casualty\'s throat or even obstruct his airway.
The right size keeps the casualty\'s tongue from falling down the back of his throat.
INSERT THE OROPHARYNGEAL AIRWAY
Position the casualty on his back.
Place your thumb and index finger of one hand on the casualty\'s upper and lower teeth near a corner of his mouth so the thumb and finger will cross when the casualty\'s mouth is opened.
Push your thumb and index finger against the casualty\'s upper and lower teeth in a scissors-like motion until his teeth separate and his mouth opens.
If the teeth do not separate, wedge your index finger behind the casualty\'s back molars and force the teeth apart.
INSERT THE OROPHARYNGEAL AIRWAY
Place the tip end of the airway into the casualty\'s mouth. Make sure the tip is on top of the tongue. Point the tip of the airway up toward the roof of the casualty\'s mouth.
Slide the airway along the roof of the casualty\'s mouth, following the natural curvature of the tongue.
When the tip of the airway reaches the back of the tongue past the soft palate, rotate the airway 180 degrees so the tip of the airway points toward the casualty\'s throat.
INSERT THE OROPHARYNGEAL AIRWAY
Advance the airway until the flange rests against the casualty\'s lips.
The airway should now be positioned so the tongue is held in place and will not slide to the back of the casualty\'s throat.
MONITOR A CASUALTY WITH AN OROPHARYNGEAL AIRWAY IN PLACE
Check the casualty\'s respirations to make sure he is still breathing adequately and the oropharyngeal airway is not blocking his airway.
Adjust the position of the oropharyngeal airway, if needed.
MONITOR A CASUALTY WITH AN OROPHARYNGEAL AIRWAY IN PLACE
Question:
Should you tie or tape the airway in place?
Response:
No.
Question:
What should you do if the casualty begins to regain consciousness?
Response:
Remove the airway.
INSERT AN OROPHARYNGEAL AIRWAY IN AN UNCONSCIOUS CASUALTY
CLOSING Remember, only use the oropharyngeal airway on an unconscious casualty, never on a conscious or semiconscious casualty. This is tested in the written multiple-choice examination.
Questions ADMINISTER FIRST AID TO CHEMICAL AGENT CASUALTIES
INTRODUCTION You have already demonstrated your ability to initiate emergency care to a casualty suffering from nerve agent poisoning. In this , you will learn to determine whether additional atropine is needed by the nerve agent casualty and, if needed, to administer additional injections of atropine. You will also learn to provide aid to victims of other chemical agents, that is, blister agents, blood agents, and choking agents.
ADMINISTER FIRST AID TO CHEMICAL AGENT CASUALTIES
TASK
Identify signs and symptoms of chemical agent poisonings and their treatments.
CONDITIONS
Given written items pertaining to the identification and treatment of chemical agent casualties.
STANDARD
Score 70 or more points on the 100-point written examination.
IDENTIFY SIGNS AND SYMPTOMS OF SEVERE NERVE AGENT POISONING
Signs of mild nerve agent poisoning such as a runny nose, drooling, tightness in the chest, cramps, and nausea.
Strange and confused behavior.
Wheezing, coughing, and gurgling sounds while breathing,
Severely pinpointed pupils.
Red eyes with tears present.
Vomiting.
IDENTIFY SIGNS AND SYMPTOMS OF SEVERE NERVE AGENT POISONING
Severe muscular twitching (spasms).
Loss of bladder and bowel failure (not breathing).
TREAT A CASUALTY WITH SEVERE NERVE AGENT POISONING
Remember: Provide care to casualties only after you have masked, put on your own protective clothing, and decontaminated your own exposed skin (if needed).
Question:
How long do I wait after administering the three Mark I kits and CANA?
Response:
Five minutes.
TREAT A CASUALTY WITH SEVERE NERVE AGENT POISONING
Squat, insert your gloved hand beneath the casualty\'s hood, and take his carotid pulse using two fingers (not your thumb).
Question:
Why squat instead of kneeling?
Response:
If you kneel, the chemical agents on the ground will reduce your protective clothing\'s ability to protect you.
TREAT A CASUALTY WITH SEVERE NERVE AGENT POISONING
Question:
The casualty requires additional atropine if his pulse is under how many beats per minute?
Response:
If it is under 90 beats per minute.
TREAT A CASUALTY WITH SEVERE NERVE AGENT POISONING
Administer Additional Atropine
Remove an atropine autoinjector from your aid bag, tear the clear plastic protective bag, and remove the autoinjector.
Form a fist around the autoinjector with your dominant hand.
Grasp the yellow safety cap with your other hand. Pull the yellow safety cap away from the body of the autoinjector.
TREAT A CASUALTY WITH SEVERE NERVE AGENT POISONING
Place the green end of the autoinjector against and at a 90 degree angle to the injection site. [Normally, the injection site is on the outer thigh below the hip and above the knee. If the casualty is very thin, the upper, outer quadrant of his buttocks is used as the injection site.]
Apply firm, even pressure to make the autoinjector function.
TREAT A CASUALTY WITH SEVERE NERVE AGENT POISONING
Question:
How long do you leave the needle in the muscle?
Response:
At least 10 seconds.
Remove injector from casualty.
Question:
What should I do with the used injector?
Response:
Attach the used autoinjector to the casualty\'s outer clothing (pocket flap) to inform medical personnel what medication the casualty received and how much he received.
TREAT A CASUALTY WITH SEVERE NERVE AGENT POISONING
Question:
How long should you wait between injections, assuming that his pulse rate is still below 90 beats per minute?
Response:
Five minutes.
Administer Additional CANA
Administer a second CANA if the casualty is still suffering convulsions 5 to 10 minutes after administering the first CANA. If the casualty still has convulsions 5 to 10 minutes later administer a third CANA.
TREAT A CASUALTY WITH SEVERE NERVE AGENT POISONING
Question:
What is the maximum number of CANA autoinjectors you should administer to a casualty.
Response:
Three.
IDENTIFY SIGNS AND SYMPTOMS OF EXPOSURE TO BLISTER AGENTS Blister agents act primarily on the eyes, respiratory tract, and skin. The eyes are very sensitive and are usually the first to be affected by blister agents. Signs and symptoms affecting the skin and respiratory track may not appear for several hours following exposure.
IDENTIFY SIGNS AND SYMPTOMS OF EXPOSURE TO BLISTER AGENTS
Eyes
Sensitivity to light.
Gritty feeling in eyes.
Inflammation of the inner eyelids.
Swelling and spasms of the eyelids.
Watery eyes.
Pain.
IDENTIFY SIGNS AND SYMPTOMS OF EXPOSURE TO BLISTER AGENTS
Skin
Itching.
Swelling and redness.
Blisters.
Pain. (If lewisite or phosgene oxide, pain is immediate and intense.)
IDENTIFY SIGNS AND SYMPTOMS OF EXPOSURE TO BLISTER AGENTS
Respiratory Tract
Throat irritation (dry, burning sensation).
Harsh cough and hoarse voice.
Phlegm (mucous discharge) or frothy sputum.
Runny nose and frequent sneezing.
IDENTIFY SIGNS AND SYMPTOMS OF EXPOSURE TO BLISTER AGENTS
Other
Headache.
Nausea and vomiting.
Diarrhea.
TREAT A CASUALTY EXPOSED TO A BLISTER AGENT
After the casualty is masked, quickly flush the casualty\'s eye if liquid blister agent is present in the eye. If agent is present in both eyes, flush both eyes.
Remove and open the casualty\'s canteen.
Have the casualty take a deep breath and hold it.
Lift the casualty\'s mask from his chin so his eyes are exposed.
Tilt the casualty\'s head to one side so the eye to be flushed is lower than the other eye.
Have the casualty open his lower eye.
TREAT A CASUALTY EXPOSED TO A BLISTER AGENT
Pour the water from the canteen gently into the lower eye, pouring from the inner edge of the eye to the outer edge.
Continue to flush the eye with water until the blister agent has been flushed from the eye.
If both eyes are contaminated, tilt the casualty\'s head so the other eye is now lower than the flushed eye and flush the second eye in the same manner.
Replace the casualty\'s mask. Have him clear his mask resume normal breathing.
TREAT A CASUALTY EXPOSED TO A BLISTER AGENT
Question:
What should you do once you have removed any liquid blister agent from the casualty\'s eyes?
Response:
Decontaminate the casualty\'s face and exposed skin, then evacuate the casualty as soon as practical.
Question:
Assume blisters have formed on the casualty\'s unprotected forearms. Should you decontaminate the blisters?
Response:
Do not decontaminate or break the blistered areas.
Washing eyes may not result in symptoms going away. Do not reflush.
IDENTIFY SIGNS AND SYMPTOMS OF EXPOSURE TO CHOKING AGENTS Choking agents are chemical agents that attack the lungs and cause them to fill with fluid. Early signs and symptoms will subside rapidly and allow the casualty to carry on with his combat mission if needed. If the casualty was exposed to a sufficient amount of choking agent, late signs and symptoms usually appear 4 to 24 hours after initial exposure.
IDENTIFY SIGNS AND SYMPTOMS OF EXPOSURE TO CHOKING AGENTS
Early Signs and Symptoms of Exposure to Choking Agents
Tears.
Dry throat.
Tightness in the chest.
Choking cough.
Nausea or vomiting.
Headache.
IDENTIFY SIGNS AND SYMPTOMS OF EXPOSURE TO CHOKING AGENTS
Late Signs and Symptoms of Exposure to Choking shallow breathing.
Weak, but rapid, pulse (tachycardia).
Serious attacks of coughing that produce white or yellowish fluid, sometimes frothy and tinted with blood.
Cyanosis (bluish tint to lips and nailbeds).
Shock.
Respiratory arrest.
TREAT A CASUALTY EXPOSED TO CHOKING AGENTS
Mask the casualty.
Instruct a casualty with early signs and symptoms of choking agent poisoning to sit until the signs and symptoms have subsided if the military situation permits. Have the casualty evaluated by medical personnel when possible.
If a casualty shows late signs and symptoms, have him rest in a sitting position and keep him warm. Evacuate him as soon as possible.
IDENTIFY SIGNS AND SYMPTOMS OF BLOOD AGENT POISONING
Blood agents interfere with the body\'s ability to use oxygen. They may also attack the lungs like choking agents. Signs and symptoms of choking agent poisoning include:
Dizziness and headache.
Cherry-red skin.
Irritation of the eyes, nose, and throat.
Nausea and vomiting.
Slow pulse (bradycardia).
IDENTIFY SIGNS AND SYMPTOMS OF BLOOD AGENT POISONING
Fast and deep breathing in the initial phase, followed by shallow breathing and faintness due to a decrease of usable oxygen.
Convulsions.
Respiratory arrest.
Cardiac arrest.
TREAT A CASUALTY WITH BLOOD AGENT POISONING
Mask the casualty.
Evacuate the casualty to the nearest medical treatment facility as quickly as possible.
ADMINISTER FIRST AID TO CHEMICAL AGENT CASUALTIES
CLOSING Chemical agents are deadly. Immediate treatment can help chemical agent casualties to survive until they can be evacuated to a medical treatment facility where they can receive medical treatment. Remember to take adequate protective measures yourself before helping a casualty who has been overcome by chemical agents.
This is tested in the written multiple-choice examination.
Questions IDENTIFY AND TREAT COLD INJURIES
INTRODUCTION Cold injuries have always been a threat to military forces operating in cold climates. In addition to frostbite (which occurs in freezing weather), there are several cold injuries such as trench foot, chilblain, and hypothermia which can occur even when the temperature is above freezing.
IDENTIFY AND TREAT COLD INJURIES
TASK
Identify the proper procedures for treating a cold injury casualty.
CONDITION
Given written items pertaining to the identification and treatment of cold injuries.
STANDARD
Score 70 or more points on the 100-point written examination.
IDENTIFY SIGNS AND SYMPTOMS OF CHILBLAIN
Skin exposed to cool temperatures (50 degrees F or lower).
Acutely red, swollen, hot, tender, and/or itching skin.
Open sores or bleeding lesions from continued exposure.
TREAT A CASUALTY WITH CHILBLAIN
Apply local warming (put bare hands over the affected area on the face, put affected hands inside the uniform under the armpits, etc.).
Do not rub or massage the affected area.
Apply a field dressing to lesions (sores).
Have the casualty examined by medical personnel when the opportunity presents itself.
IDENTIFY SIGNS AND SYMPTOMS OF IMMERSION SYNDROME
Hand or foot in water for an extended time.
Affected hand or foot may have blisters, swelling, redness, and bleeding.
First phase: Hand or foot is cold and without pain.
Second phase: Affected limb feels burning hot and has shooting pains.
Third phase: Pale skin, bluish coloring around the nailbeds and lips, weak pulse.
TREAT A CASUALTY WITH IMMERSION SYNDROME
Dry the affected part immediately.
Remove wet clothing and replace with dry, warm clothing.
Rewarm the affected area gradually in warm air.
Do not rub or massage the affected hand or foot.
Elevate the affected part to reduce swelling.
Protect the casualty from additional injury.
Evacuate casualty to a medical treatment facility as soon as practical.
IDENTIFY SIGNS AND SYMPTOMS OF FROSTBITE
Flesh has been exposed to freezing temperatures (below 32 degrees F).
Usually occurs on the feet, toes, nose, ears, chin, cheeks, forehead, fingers, hands, and wrists.
Superficial Frostbite
A reddish (in light-skinned individuals) or grayish (in dark-skinned individuals) area on exposed skin.
A sudden blanching (whitening) of the affected area.
A tingling sensation, followed by numbness.
IDENTIFY SIGNS AND SYMPTOMS OF FROSTBITE
Deep Frostbite
Total lack of feeling in the affected (frozen) tissue.
Pale, yellowish, waxy-looking skin.
Solid flesh (feels wooden to the touch).
Red-violet discoloration, blisters, and sloughing of affected skin may occur (usually 1 to 5 days after the initial injury).
TREAT A CASUALTY WITH FROSTBITE
Move the casualty to a sheltered area.
Loosen constricting clothing.
Remove jewelry on the affected limb, if applicable. (A ring on a swollen finger could interfere with blood circulation.).
TREAT A CASUALTY WITH FROSTBITE
Gradually warm the casualty.
Use the same warming procedures as with chilblain.
If the feet are frostbitten, remove the casualty\'s boots and socks and put his feet against the exposed abdomen of another soldier. Cover both soldiers to keep them warm.
Do not expose the frostbitten area to extreme heat which could result in burns.
Do not rub, massage, or soak the frostbitten area.
Give the casualty something warm to drink.
Do not give alcoholic beverages or tobacco products to the casualty. Alcohol and tobacco can promote heat loss.
TREAT A CASUALTY WITH FROSTBITE
Protect the frostbitten area from cold and additional injury.
Evacuate the casualty to a medical treatment facility as soon as possible. If the casualty\'s frozen feet must be exposed to freezing temperature during evacuation, do not thaw his feet prior to evacuation.
Question:
Suppose a soldier has a foot with deep frostbite and will have to walk to a nearby medical treatment facility. Should you warm his foot before sending him to the facility?
Response:
No.
IDENTIFY SIGNS AND SYMPTOMS OF GENERALIZED HYPOTHERMIA Generalized hypothermia occurs when the whole body (rather than just a body part) is cooled to an unusually low temperature. It is a medical emergency which can result in death if not treated promptly. Generalized hypothermia is often called simply \"hypothermia.\"
IDENTIFY SIGNS AND SYMPTOMS OF GENERALIZED HYPOTHERMIA
Moderate Hypothermia
Apathetic, lethargic behavior.
Pale, cold skin.
Acetone (sweet, fruity) breath odor.
Shivering, which soon stops.
IDENTIFY SIGNS AND SYMPTOMS OF GENERALIZED HYPOTHERMIA
Severe Hypothermia
Skin ice cold.
Slow, shallow respirations.
Faint, irregular pulse or lack of detectable pulse.
Glassy eyes.
Mental confusion.
Unconsciousness.
TREAT A CASUALTY WITH GENERALIZED HYPOTHERMIA
Moderate Hypothermia
Move the casualty out of the wind to a sheltered
environment.
Replace wet clothing with dry clothing or sleeping bags.
Cover the casualty with blankets or other insulating material.
TREAT A CASUALTY WITH GENERALIZED HYPOTHERMIA
Give the casualty warm, nutritious fluids to drink.
Do not give alcoholic beverages or tobacco products to the casualty.
Wrap the casualty from head to toe and evacuate to a medical treatment facility in a recumbent (lying down) position.
TREAT A CASUALTY WITH GENERALIZED HYPOTHERMIA
Severe Hypothermia
Cut away wet clothing and replace with dry clothing.
Ensure that the casualty\'s airway remains open and the casualty continues to breathe.
Perform mouth-to-mouth resuscitation if the casualty\'s breathing rate drops below five respirations per minute.
Use J-tube if needed and the casualty is unconscious.
TREAT A CASUALTY WITH GENERALIZED HYPOTHERMIA
Apply an additional heat source since the casualty\'s body cannot generate sufficient body heat to warm itself.
Have another soldier remove his outer clothing and get into the same sleeping bag as the casualty, then covering both soldiers. The second soldier\'s body heat will warm the casualty\'s body.
Evacuate the casualty to a medical treatment facility as soon as possible.
Evacuate the casualty even if you cannot detect respiration or a heartbeat.
Be gentle when moving the casualty.
IDENTIFY SIGNS AND SYMPTOMS OF SNOW BLINDNESS
Snow blindness is a temporary loss of sight caused by ultraviolet rays from the sun reflecting off snow or ice. Snow blindness can usually be prevented by wearing regular or improvised sunglasses which cut down on the amount of ultraviolet rays which reach the eyes.
IDENTIFY SIGNS AND SYMPTOMS OF SNOW BLINDNESS
Question:
Suppose a soldier working in an ice-covered terrain says that he will not wear his sunglasses because it is cloudy? Should the soldier still wear his sunglasses?
Response:
Yes. Snow blindness often occurs in cloudy or hazy weather. Clouds and haze do not stop the invisible ultraviolet radiation.
IDENTIFY SIGNS AND SYMPTOMS OF SNOW BLINDNESS
Scratchy feeling in the eyes as though dirt or sand were present in the eyes, sometimes more severe pain.
Decreased vision.
Tears.
Difficulty in opening eyelids.
Headache.
Pain.
TREAT A CASUALTY WITH SNOW BLINDNESS
Cover the casualty\'s eyes with a dark cloth.
Reassure the casualty that the condition is temporary and he will regain his sight.
Evacuate him to a medical treatment facility as soon as practical.
COLD INJURIES
Question:
Of the cold injuries discussed, which is a medical emergency requiring immediate treatment?
Response:
Hypothermia.
IDENTIFY AND TREAT COLD INJURIES
CLOSING Cold can be a deadly enemy. Soldiers can protect themselves from this enemy by taking preventive measures. The buddy-system should be used since it may be easier to detect the early signs and symptoms of cold injury on another person than on yourself. If a soldier does become a cold injury casualty, you must be ready to recognize the problem and provide proper treatment. This is tested in the written multiple-choice examination.
Questions MANAGE A CASUALTY WITH COMBAT STRESS REACTION (BATTLE FATIGUE)
INTRODUCTION Not all casualties have bleeding wounds, broken bones, or chemical agent poisoning. Some casualties suffer psychological injuries, commonly referred to as combat stress reaction, but since World War II it has also been called battle fatigue. Most combat stress casualties can be treated without evacuating them out of the combat zone. Sometimes the treatment is simply making sure the soldier gets a good night\'s rest, warm food, and a change of clothing.
MANAGE A CASUALTY WITH COMBAT STRESS REACTION (BATTLE FATIGUE)
INTRODUCTION (cont) Combat stress can be mild to severe. Mild cases do not seriously interfere with the soldier\'s effectiveness. If the combat stress is moderate to severe, the soldier is ineffective and usually requires evacuation. Moderate and severe combat stress reactions are sometimes referred to as \"more serious\" combat stress.
MANAGE A CASUALTY WITH COMBAT STRESS REACTION (BATTLE FATIGUE)
TASK
Identify characteristics of combat stress reaction and its treatment.
CONDITIONS
Given written items pertaining to the identification and treatment of combat stress reaction.
STANDARD
Score 70 or more points on the 100-point written examination.
IDENTIFY THE CAUSES OF COMBAT STRESS
Some of the problems which contribute to the development of combat stress are:
Physical exhaustion.
Constant alertness.
Loss of sleep.
Trauma of seeing fellow soldiers wounded or killed.
Fear of being killed or maimed.
Fear of killing other people.
Fear of failure or disgrace.
Worry about family problems back home.
IDENTIFY THE SIGNS AND SYMPTOMS OF MILD COMBAT STRESS REACTION
Physical Signs and Symptoms
Tenseness, jumpy, startled at sudden sounds or movement.
Headache, backache, pain in old wounds.
Fidgeting, fine trembling of the hands, fumbling.
Cold sweat, dry mouth, pale skin.
Blurred vision.
IDENTIFY THE SIGNS AND SYMPTOMS OF MILD COMBAT STRESS REACTION
Pounding heart, feeling dizzy or light-headed.
Feeling \"out of breath,\" breathing too rapidly.
Tingling, cramps, or numbness in fingers and toes.
Upset stomach, \"dry heaves,\" or actual vomiting.
Uncontrollable emptying of bowels and bladder when danger suddenly appears.
Fatigue, feeling drained of energy.
Blank, haunted, \"1000-yard\" stare.
IDENTIFY THE SIGNS AND SYMPTOMS OF MILD COMBAT STRESS REACTION
Mental and Emotional Signs and Symptoms
Anxiety, worrying, bothered by little things.
Irritability, complaining.
Difficulty in paying attention or remembering details.
Difficulty in thinking, speaking, and communicating.
Sleeping difficulties, such as being awakened by bad dreams.
Grieving, tearfulness, crying for a dead or wounded buddy.
IDENTIFY THE SIGNS AND SYMPTOMS OF MILD COMBAT STRESS REACTION
Feeling guilty about mistakes made or at things that had to be done.
Anger, resentment.
Feeling let down others, loss of confidence in self and/or others.
TREAT A CASUALTY WITH MILD COMBAT STRESS REACTION
Be calm.
Keep the soldier focused on the unit\'s immediate mission.
Encourage the soldier to eat, bathe, and sleep as the tactical mission and safety permit.
Keep the soldier busy when he is not resting.
Get the soldier to perform simple, well-learned tasks.
Have the soldier use relaxation techniques (take a deep breath and let it out slowly, etc.).
TREAT A CASUALTY WITH MILD COMBAT STRESS REACTION
Allow and encourage the soldier to ventilate his feelings.
Remind the soldier that some degree of combat stress reaction is normal and to be expected.
IDENTIFY THE SIGNS AND SYMPTOMS OF MODERATE/SEVERE COMBAT STRESS REACTION
Physical Signs and Symptoms
Cannot keep still, constantly moving around.
Arms or whole body shake.
Cowering in terror.
Flinching or ducking at almost any sudden sound or movement.
Sudden paralysis (hand, arm, leg) with no injury.
Sudden blindness or deafness (partial or complete) with no injury.
IDENTIFY THE SIGNS AND SYMPTOMS OF MODERATE/SEVERE COMBAT STRESS REACTION
Total immobility (freezing) under fire.
Total physical exhaustion (just stands or sits).
Staggering or swaying when standing.
IDENTIFY THE SIGNS AND SYMPTOMS OF MODERATE/SEVERE COMBAT STRESS REACTION
Mental and Emotional Signs and Symptoms
Rapid talking, constantly making suggestions.
Starting fights, recklessness, \"vicious\" behavior within own group, uncontrollable anger.
Social withdrawal (silence, sulking, prolonged sadness).
Inattentiveness to self-care and hygiene, no interest in eating.
Apathetic and indifferent to danger.IDENTIFY THE SIGNS AND SYMPTOMS OF MODERATE/SEVERE COMBAT STRESS REACTION
Cannot remember orders, how to perform duties, or where he is.
Inability to concentrate or make decisions.
Severe speech problems, including stuttering and inability to talk.
Fear of sleeping, even in a relatively safe area.
Sees things which are not there (usually after severe sleep loss).
Rapid emotional swings, hysteria, strange behavior.
Panic running under fire.
TREAT A CASUALTY WITH MODERATE/SEVERE COMBAT STRESS REACTION
A soldier suffering from moderate or severe combat stress reaction usually requires routine evacuation. Combat stress reaction patients should be managed separately from other patients. Combat stress reaction casualties usually recover completely after resting in a safe area, being able to clean up, and receiving hot, nutritious meals. About 70 to 85 percent of evacuated combat stress reaction casualties are capable (with good management) of returning to their combat units within three days.
TREAT A CASUALTY WITH MODERATE/SEVERE COMBAT STRESS REACTION
Early on, these patients need to talk, ventilate to any medical person. All combat stress reaction patients should be treated with the expectation of their going back to duty. Most of the remainder will return to their own unit or to another unit within two weeks.
Appear to be calm and in control of the situation.
Calmly try to talk the casualty into cooperating if he is responsive.
TREAT A CASUALTY WITH MODERATE/SEVERE COMBAT STRESS REACTION
If the soldier appears to be dangerous, take his weapon away from him.
Physically restrain the casualty if the soldier is a
danger to himself or others.
Get medical assistance if possible.
Evacuate the casualty if he does not improve or if he is dangerous. Restrain the casualty if needed.
TREAT A CASUALTY WITH MODERATE/SEVERE COMBAT STRESS REACTION
Question:
What are some of the things done to help mild and more serious combat stress casualties recover?
Response:
Normal activities such as sleeping, eating, and getting cleaned up which the soldier has been denied due to combat conditions.
Question:
About how many combat stress casualties that are evacuated return to the unit within three days?
Response:
70 to 85 percent.
MANAGE A CASUALTY WITH COMBAT STRESS REACTION (BATTLE FATIGUE)
CLOSING Procedures used to treat mild combat stress reaction casualties can also be used to prevent combat stress from developing. When a combat stress reaction casualty returns to the unit, welcome him back. Be willing to talk about what happened and express your confidence in him. Make him feel part of the unit again. Remember, no one is immune to combat stress reaction.
This is tested in the written multiple-choice examination.
Questions ADMINISTER ACETAMINOPHEN AND PSEUDOEPHEDRINE HYDROCHLORIDE TABLETS
INTRODUCTION
A soldier can have minor medical conditions such as minor aches and pains, common cold, headache, or sinus allergies which would normally be treated with medication available without a prescription. Unfortunately, on a battlefield, these \"common\" drugs may not be easily obtained. The combat lifesaver aid bag contains a supply of acetaminophen (such as Tylenol®) and pseudoephedrine hydrochloride (such as Sudafed®) tablets which can be administered to soldiers until they can obtain their own medication at sick call.
ADMINISTER ACETAMINOPHEN AND PSEUDOEPHEDRINE HYDROCHLORIDE TABLETS
TASK
Identify when acetaminophen and pseudoephedrine hydrochloride tablets should and should not be given, the appropriate dosage, and the effects of an overdose.
CONDITIONS
Given multiple-choice items pertaining to administering acetaminophen tablets and pseudoephedrine hydrochloride tablets.
STANDARD
Score 70 or more points on the 100-point written examination.
IDENTIFY WHEN ACETAMINOPHEN SHOULD AND SHOULD NOT BE ADMINISTERED
Uses of Acetaminophen Tablets
Use acetaminophen (such as Tylenol®) to treat problems such as:
Simple headache.
Muscular aches and WHEN ACETAMINOPHEN SHOULD AND SHOULD NOT BE hernia.
IDENTIFY WHEN ACETAMINOPHEN SHOULD AND SHOULD NOT BE should not be administered to a person with an allergy (sensitivity) to it, and, if the allergy appears, the drug should be discontinued.
Acetaminophen should not be administered to a pregnant woman or one nursing a baby without the advice of a health professional.
Excessive acetaminophen can be dangerous.
ADMINISTER ACETAMINOPHEN
Normal adult dosage:
One or two tablets three or four times daily.
Up to 8 tablets in a 24-hour period.
Discontinue medication if casualty shows signs of overdose.
RECOGNIZE AND TREAT ACETAMINOPHEN OVERDOSE
A soldier may carry his own supply of, say, Tylenol® and accidentally take too many tablets.
Signs and Symptoms of Acetaminophen perspiration.
General malaise.
Treatment for Acetaminophen Overdose
Have the casualty vomit, if conscious.
Evacuate the casualty to a medical treatment facility.
IDENTIFY WHEN PSEUDOEPHEDRINE HYDROCHLORIDE TABLETS SHOULD AND SHOULD NOT BE ADMINISTERED
Uses of Pseudoephedrine Hydrochloride Tablets
Use pseudoephedrine hydrochloride tablets (such as Sudafed®) to temporarily relieve the signs and symptoms of the common cold (such as nasal congestion).
Some brands of pseudoephedrine hydrochloride tablets also contain antihistamines used in treating allergic reactions to pollen and other airborne allergens (hay fever).
IDENTIFY WHEN PSEUDOEPHEDRINE HYDROCHLORIDE TABLETS SHOULD AND SHOULD NOT BE hydrochloride tablets should not be administered if the person:
Is allergic to any of the ingredients in the tablet.
Has a high fever.
IDENTIFY WHEN PSEUDOEPHEDRINE HYDROCHLORIDE TABLETS SHOULD AND SHOULD NOT BE ADMINISTERED
Pseudoephedrine hydrochloride tablets should not be administered to people with the following conditions unless a physician has approved themedication:
Heart problems.
Vascular disease.
Diabetes.
Thyroid disease.
Hypertension (high blood pressure).
Pregnancy.
Nursing a baby.
Enlarged prostate gland.
Taking a hypertensive drug.
Taking an antidepressant drug.
ADMINISTER PSEUDOEPHEDRINE HYDROCHLORIDE TABLETS
Normal adult dosage for pseudoephedrine hydrochloride tablets:
Two tablets every 4 to 6 hours as needed.
No more than 8 tablets in a 24-hour period.
RECOGNIZE AND TREAT PSEUDOEPHEDRINE HYDROCHLORIDE OVERDOSE
Discontinue if signs or symptoms of overdose appear, fever.
RECOGNIZE AND TREAT PSEUDOEPHEDRINE HYDROCHLORIDE OVERDOSE
Question:
What should you do if signs of pseudoephedrine hydrochloride overdose develop?
Response:
Evacuate the casualty.
Question:
What should you do if the acetaminophen and pseudoephedrine hydrochloride tablets do not control the casualty\'s signs and symptoms?
Response:
Have the casualty checked by a medic or report to sick call.
ADMINISTER ACETAMINOPHEN AND PSEUDOEPHEDRINE HYDROCHLORIDE TABLETS
CLOSING Even though acetaminophen and pseudoephedrine hydrochloride tablets are not prescription drugs, they can still be dangerous. Make sure the medication will help rather than harm the soldier before you give the medication to the soldier. Soldiers who are ill should go to sick call whenever possible. The soldier\'s condition may be more serious than it first appears.
This is tested in the written multiple-choice examination.
Questions TRANSPORT A CASUALTY USING A MILITARY VEHICLE
INTRODUCTION When possible, military vehicles are used to evacuate casualties. The vehicle may be a helicopter modified to be an air ambulance or a ground vehicle modified to be a ground ambulance. If these are not available, other military vehicles can be used to carry casualties. As a combat lifesaver, you may need to use tactical military vehicles to transport casualties or assist medical personnel in loading and unloading air and ground ambulances.
TRANSPORT A CASUALTY USING A MILITARY VEHICLE
TASK
Identify procedures for moving casualties by litter and loading and unloading casualties using military vehicles.
CONDITIONS
Given multiple-choice items pertaining to evacuation.
STANDARD
Score 70 or more points on the 100-point written examination.
DETERMINE THE ORDER IN WHICH CASUALTIES ARE TO BE EVACUATED
First Priority
Casualties with serious respiratory problems.
Casualties with severe blood loss.
Casualties with second and third degree burns of the face, neck, or perineum.
Casualties with closed head injuries, with decreasing mental status.
Casualties with poor blood circulation in a limb or with no detectable circulation in a limb.
DETERMINE THE ORDER IN WHICH CASUALTIES ARE TO BE EVACUATED
Second Priority
Casualties with chest wounds.
Casualties with abdominal wounds.
Casualties with extensive, serious eye injury.
Casualties with fractures.
Casualties with serious second and third degree burns not involving the face, neck, or perineum.
DETERMINE THE ORDER IN WHICH CASUALTIES ARE TO BE EVACUATED
Third Priority
Casualties with injuries which have been stabilized and do not threaten the casualty with loss of life or limb.
Casualties with injuries so severe that only extensive and complicated medical treatment can prolong their life.
MOVE A CASUALTY USING A FOUR-MAN LITTER SQUAD
Preparing the Litter
Open a standard litter.
Lock the spreader bars at each end of the litterwith your foot.
Preparing the Casualty
Place casualty onto litter using the modified two-man arms carry or the modified two-man fore-and-aft carry.
Secure the casualty to the litter with litter straps.
MOVE A CASUALTY USING A FOUR-MAN LITTER SQUAD
Preparing the Four-Man Litter Squad
Position one squad member at each litter handle with the litter squad leader at the casualty\'s right shoulder.
Question:
Why should the leader be in this position?
Response:
It is the best position for monitoring the casualty\'s condition.
MOVE A CASUALTY USING A FOUR-MAN LITTER SQUAD
If the casualty does not have a fractured leg:
Carry feet first when traveling on level ground or going down.
Carry head first when going up a hill or up stairs.
If the casualty has a fractured leg:
Carry head first when traveling on level ground or going down.
Carry feet first going up a hill or stairs.
Question:
Why would you change the procedures for a casualty with a fractured leg?
Response:
To keep the weight of the casualty\'s body from pressing on the fracture.
MOVE A CASUALTY USING A FOUR-MAN LITTER SQUAD
Lifting the Litter
On the preparatory command, \"Prepare to lift,” the four bearers kneel beside and grasp litter handles.
On the command of execution, \"LIFT,\" all bearers rise together.
On the command, \"Four-man carry, MOVE,\" all bearers walk forward in unison.
Uphill Carry
Used to go up a hill or stairs.MOVE A CASUALTY USING A FOUR-MAN LITTER SQUAD
Downhill Carry
Used to go down a hill or stairs.MOVE A CASUALTY USING A FOUR-MAN LITTER SQUAD
Litter Post Carry
Used to keep the litter level in rough terrain.MOVE A CASUALTY USING A FOUR-MAN LITTER SQUAD
Litter Rotation
To change direction of movement, such as from feet first to head first, begin in a litter post carry position. The front and back bearers release the litter and the middle bearers rotate the litter and themselves.LOAD CASUALTIES INTO GROUND AMBULANCES
General Rules for Using Ground Ambulances
Ground ambulances have medical specialists to take care of the casualties during evacuation.
Follow any special instructions for loading, securing, or unloading casualties.
Make sure each litter casualty is secured to his litter. Use litter straps when available.
Load the most seriously injured casualty last.
LOAD CASUALTIES INTO GROUND AMBULANCES
Load a casualty head first (head in the direction of travel) rather than feet first.
Make sure each litter is secured to the vehicle.
Unload casualties in the reverse order in which they are loaded.
Question:
When is the most seriously injured litter casualty unloaded?
Response:
First.
LOAD CASUALTIES INTO GROUND AMBULANCES
M170 1/4-Ton Truck Ambulance (Frontline Ambulance)
Designed to carry:
3 litter casualties, or
5 ambulatory (walking) casualties, or
2 litter casualties and 3 ambulatory casualties (mixed load).
Sequence for loading 3 litter casualties:
Upper right berth.
Lower right berth.
Left berth.LOAD CASUALTIES INTO GROUND AMBULANCES
Sequence for loading a mixed load:
Upper right berth.
Lower right berth.
Ambulatory casualties.
LOAD CASUALTIES INTO GROUND AMBULANCES
M1010 1 1/4-Ton Truck Ambulance
Designed to carry:
4 litter casualties, or
8 ambulatory casualties, or
2 litter casualties and 4 ambulatory casualties (mixed load).
Sequence for loading 4 litter casualties:
Upper right berth.
Lower right berth.
Upper left berth.
Lower left berth.LOAD CASUALTIES INTO GROUND AMBULANCES
Sequence for loading a mixed load:
Upper right berth.
Lower right berth.
Ambulatory casualties on left side.
LOAD CASUALTIES INTO GROUND AMBULANCES
M996 Armored Ambulance (HMMWV)
Designed to carry:
2 litter casualties, or
6 ambulatory casualties, or 1 litter casualty and 3 ambulatory casualties (mixed load).
Sequence for loading 2 litter casualties:
Right berth.
Left berth.LOAD CASUALTIES INTO GROUND AMBULANCES
M997 Armored Ambulance (HMMWV)
Designed to carry:
4 litter casualties, or
8 ambulatory casualties, or
2 litter casualties and 4 ambulatory casualties (mixed load).
Sequence for loading 4 litter casualties:
Upper right berth.
Lower right berth.
Upper left berth.
Lower left berth.LOAD CASUALTIES INTO GROUND AMBULANCES
Sequence for loading 2 litter casualties:
Upper right berth.
Lower right berth.
Ambulatory casualties on left side.
LOAD CASUALTIES INTO GROUND AMBULANCES
M792 1 1/4-Ton Truck Ambulance
Designed to carry:
3 litter casualties, or
6 ambulatory casualties, or
2 litter casualties and 3 ambulatory casualties (mixed load).
Sequence for loading 3 litter casualties:
Upper right berth.
Upper left berth.
Lower center berth.
Sequence for loading 2 litter casualties:
Upper berth.
Lower center berth.
Ambulatory casualties on remaining side.
LOAD CASUALTIES INTO GROUND AMBULANCES
M113 Full-Tracked Armored Personnel Carrier
An M113 armored personnel carrier is transformed into an ambulance by removing the spall liner and installing the litter suspension kit.
Designed to carry:
4 litter casualties, or
10 ambulatory casualties, or 2 litter casualties and 5 ambulatory casualties (mixed load).
Sequence for loading 4 litter casualties:
Upper right berth.
Lower right berth.
Upper left berth.
Lower left berth (most seriously injured casualty).LOAD CASUALTIES INTO AIR AMBULANCES
Casualties may be evacuated by helicopter, especially if the distance to be traveled is great and the location hard to reach.
LOAD CASUALTIES INTO AIR AMBULANCES
General Rules for Using Air Ambulances
Air ambulances have medical specialists to take care of the casualties during evacuation. Follow any special instructions for loading, securing, or unloading casualties.
Remain 50 yards from the helicopter until the litter squad is signaled to approach the aircraft.
Approach the aircraft from the front so the litter squad is in full view of the pilot. Keep a low silhouette when approaching the aircraft.
LOAD CASUALTIES INTO AIR AMBULANCES
Approach and leave the aircraft quickly, but do not run.
Avoid the area near the rear rotor of the Blackhawk and Iroquois air ambulance helicopters.
If you must go from one side of the helicopter to the other, go around the front of the helicopter.
LOAD CASUALTIES INTO AIR AMBULANCESWARNING!
NEVER GO AROUND THE REAR OF THE HELICOPTER AND ALWAYS GO FROM THE DOWNHILL SIDE.
LOAD CASUALTIES INTO AIR AMBULANCES
Take orders from the combat medic or loadmaster on the aircraft.
Load the most seriously injured casualty last.
Load the casualty which will occupy the upper berth first; then load the next litter casualty immediately under the first casualty. This is done to keep a casualty from accidentally falling on another casualty should his litter drop before it is secured.
LOAD CASUALTIES INTO AIR AMBULANCES
When casualties are placed lengthwise, position them with their heads toward the direction of travel.
Make sure each litter casualty is secured to his litter.
Make sure each litter is secured to the aircraft.
Unload casualties in the reverse order in which they are loaded, unloading the most seriously injured casualty first.
LOAD CASUALTIES INTO AIR AMBULANCES
UH-60A Blackhawk Air Ambulance
The Blackhawk is the primary air ambulance used in combat. There are two methods of configuring a Blackhawk helicopter to serve as an air ambulance.
Normal configuration is designed to carry:
4 litter casualties and one ambulatory casualty, or
7 ambulatory casualties, or
2 litter casualties and 4 ambulatory casualties (mixed load).LOAD CASUALTIES INTO AIR AMBULANCES
Other configuration is designed to carry:
6 litter casualties and one ambulatory casualty, or
7 ambulatory casualties, or
3 litter casualties and 4 ambulatory casualties (mixed load).
Litter casualties can be loaded on both sides of the helicopter (top to bottom) simultaneously.
LOAD CASUALTIES INTO AIR AMBULANCES
UH-1H/V Iroquois Air Ambulance
Designed to carry:
6 litter casualties, or
9 ambulatory casualties, or
3 litter casualties and 4 ambulatory casualties (mixed load).LOAD CASUALTIES INTO AIR AMBULANCES
Loading 6 litter casualties:
Load the casualties lengthwise (heads forward toward the direction of travel) with three casualties on each side.
Litter casualties can be loaded on both sides of the helicopter (top to bottom) simultaneously.LOAD CASUALTIES INTO AIR AMBULANCES
Loading a mixed load:
Load three casualties crosswise (top to bottom) across the back of the compartment.
Seat the ambulatory casualties seated in the forward part of the compartment (two on the right side and two on the left side).LOAD CASUALTIES INTO AIR AMBULANCES
CH-47 Chinook Air Ambulance
The CH-47 Chinook air ambulance is a dual rotary-wing aircraft.
Designed to carry:
Up to 24 litter casualties, or
31 ambulatory casualties, or
Several combinations of mixed loads.
Litter racks are filled from front to back and from top to bottom. Any ambulatory casualties are usually seated in the front of the compartment.LOAD CASUALTIES ON GROUND MILITARY VEHICLES
Nonmedical military vehicles can be used to evacuate casualties when no medical evacuation vehicles are available.
General Rules for Using Tactical Ground Vehicles
If medical personnel are present, follow their instructions for loading, securing, and unloading casualties.
When loading casualties into a vehicle, the most seriously injured casualty is usually loaded last.
LOAD CASUALTIES ON GROUND MILITARY VEHICLES
When a casualty is placed lengthwise, load him with his head pointing forward toward the direction of travel.
Make sure each litter casualty is secured to his litter. Use litter straps, if available.
Secure each litter to the vehicle as it is loaded into place. Make sure all litters are secured.
Unload casualties in the reverse order in which they are loaded, with the most seriously injured casualty being unloaded first.
LOAD CASUALTIES ON GROUND MILITARY VEHICLES
M151 1/4-Ton Utility Truck with Trailer
An M151, 4x4, 1/4-ton utility truck, commonly called the jeep, can be used to evacuate two litter casualties. A two-wheeled trailer can be attached to the M151 truck and be used to transport two additional litter casualties.
Place the first litter across the back of the vehicle with the litter handles resting on the sides of the vehicle.
Place the second litter lengthwise on the right side of the vehicle with the rear handles resting on the side of the first litter and the front stirrups (stands) of the litter fitted into the groove below the windshield.LOAD CASUALTIES ON GROUND MILITARY VEHICLES
An alternate method is to rest the front handles on the windshield frame and have the rear handles straddle the spare tire.
Place the third and fourth litters lengthwise on the trailer with the casualties\' heads toward the direction of travel. Litters can be loaded simultaneously. Secure the handles of the litters to the small hooks on the side of the trailer with bindings.
LOAD CASUALTIES ON GROUND MILITARY VEHICLES
M880, M890, or M1008 1 1/4-Ton Cargo Truck
M880, M890, and M1008, 4x4 or 4x2, 1 1/4-ton cargo trucks are light-weight vehicles used to transport personnel or light cargo. They can be adapted to evacuate up to five litter casualties.
To prepare the vehicle for evacuating litter casualties:
Fold the fabric cover and metal bows forward (toward the truck cab) as an assembly and secure the assembly to the front bow.
Lower the tailgate.
Lower the seats and lock them in place.LOAD CASUALTIES ON GROUND MILITARY VEHICLES
To load 5 litter casualties:
Load the first litter crosswise across the sideboards close to the truck cab, usually with the casualty\'s head behind the driver\'s seat.
Load the second litter crosswise across the sideboards next to the first litter, usually with the casualty\'s head behind the passenger\'s seat (loaded alternately head to foot).
Load the third litter crosswise across the sideboards next to the second litter, usually with the casualty\'s head behind the driver\'s seat.
Load the fourth litter head first (toward the cab) on the right side of the bed of the truck.
LOAD CASUALTIES ON GROUND MILITARY VEHICLES
Use the litter stirrups.
Load the fifth litter head first on the left side of the bed of the truck. Use the litter stirrups to keep the litter off the floor.
Raise and fasten the tailgate to secure the lower litters.
LOAD CASUALTIES ON GROUND MILITARY VEHICLES
2 1/2-Ton or 5-Ton Wide Bed Cargo Truck
The 2 1/2-ton or the 5-ton, 6x6, cargo truck can be used to transport up to 12 litter casualties.
To prepare the truck for evacuating litter casualties:
Roll the canvas top forward toward the truck cab and secure it to the front bow.
Lower the tailgate.
Lower the seats and lock them in place.LOAD CASUALTIES ON GROUND MILITARY VEHICLES
Load litter casualties in the following manner:
Load the first group of three litters crosswise across the seats in the front half (near the cab) of the truck with the litter handles resting on the seats. The casualties are usually placed head to foot (head of first casualty behind driver\'s side, head of second casualty behind passenger\'s side, and head of third casualty behind driver\'s side).
Load the second group of three litters lengthwise on the floor in the front half (near the cab) of the truck beneath the first group of litters. Load the casualties head first (head toward the cab). Use the stirrups to keep the litters off the floor.
Load the third group of three litters crosswise across the seats in the rear half of the truck with the litter handles resting on the seats.
LOAD CASUALTIES ON GROUND MILITARY VEHICLES
Continue to alternate casualties (head of seventh casualty behind passenger\'s side, head of eighth casualty behind driver\'s side, and head of ninth casualty behind driver\'s side).
Load the fourth group of three litters lengthwise on the floor in the rear half of the truck beneath the third group of litters. Load the casualties with their heads toward the cab. Use the stirrups to keep the litters off the floor.
Raise and secure the tailgate as high as possible to help secure the litters in place.
TRANSPORT A CASUALTY USING A MILITARY VEHICLE
CLOSING As a combat lifesaver, you will probably be asked to assist the combat medic in evacuating wounded personnel when your combat duties allow. If no combat medic is available, you may need to instruct other soldiers in the procedures for evacuating litter casualties.
This is tested in the written multiple-choice examination.
Questions EVALUATE THE CASUALTY
INTRODUCTION
As a combat lifesaver, you will evaluate and treat soldiers as your combat duties permit. This requires you to apply the buddy-aid skills presented in IS0824 and the medical skills presented in IS0825. You must identify what is wrong with the casualty and determine the sequence in which the various treatments will be given. For example, you would restore breathing to a casualty before you would splint his fractured leg. In general, you will restore breathing, then control any major bleeding, then take measures to control shock.
EVALUATE THE CASUALTY
Once life-threatening conditions and/or injuries have been identified and treated, look for other injuries or problems and treat them.
If you have more than one casualty, perform a quick primary survey of each casualty. If you find a life-threatening condition during your primary survey, treat that condition immediately. After you have performed primary surveys on all casualties and have treated all immediate life-threatening conditions, perform a secondary survey on each casualty. Treat the more seriously injured casualty first.
EVALUATE THE CASUALTY
Use common sense when evaluating a casualty. If the environmental conditions favor heat injuries, for example, pay special attention to signs and symptoms of heat injury while also quickly checking for other injuries.
Some evaluations may be performed so fast they may appear to be skipped. If a casualty is yelling in pain, for example, you do not need to perform additional checks to determine if the casualty is conscious and breathing.
EVALUATE THE CASUALTY
TASK
Identify appropriate evaluation and treatment procedures, including sequence, performed on the battlefield.
CONDITIONS
Given multiple-choice examination items pertaining to evaluating and treating a casualty.
STANDARD
Score 70 or more points on the 100-point written examination.
PERFORM A GENERAL SURVEY OF THE SCENE
Quickly evaluate your immediate surroundings to gather vital information.
Look for obvious, immediate, life-threatening hazards such as flames, the possibility of an immediate explosion, enemy fire, and electrical hazards. If your life and the casualty\'s life are in danger due to your immediate environment, tactically move the casualty and yourself to safety, thus preventing yourself from being injured.
PERFORM A GENERAL SURVEY OF THE SCENE
Note the physical surroundings and the climate. A wall may indicate that the casualty could have fallen. Hot weather may indicate the possibility of heat injury.
Note the type of battle or incident that occurred. This may help you determine the type of injuries you can expect (bullet wounds after a fire fight, shrapnel injuries after a mortar attack, fractured limbs and spinal injuries after an airborne accident, etc.)
Note whether chemical agents may be present.
PROTECT CASUALTY FROM HAZARDS
If a life-threatening hazard (such as a burning building) is present, remove the casualty to a place of safety using the cradle drop drag or other appropriate carry (IS0824, 15).
If the casualty is being burned (flames, chemicals, electrical current, etc.), eliminate the source of the burn (IS0824, 11). Take care to prevent being injured yourself, especially if separating the casualty from an electrical wire.
If a spinal injury is suspected (IS0824, 10), take care to prevent additional damage to the spinal column. Immobilize the casualty\'s neck and back after completing your primary survey.
PERFORM A PRIMARY SURVEY OF THE CASUALTY
Mask and Treat a Chemical Agent Casualty
If you are in a chemical environment, make sure the casualty is properly masked. If signs of severe nerve agent poisoning are present, administer three Mark I kits and one CANA (IS0824, 13).
If liquid blister agent is in the casualty\'s eyes, flush his eyes with water even if you are still in a chemical environment (IS0825, 22).
PERFORM A PRIMARY SURVEY OF THE CASUALTY
Check the Casualty for Responsiveness
Calmly ask in a loud voice, \"Are you okay?\" or some similar question that demands a response from the casualty. If he does not respond, gently shake him or tap him on the shoulder and repeat the question.
If the casualty responds, ask the casualty for information (\"Where do you hurt?\" \"Were you hit?\" \"Were you exposed to chemical agents?” etc.) This information will be useful in your evaluation, but continue to evaluate the casualty in a systematic method since the injury that hurts the most may not be the injury that needs to be treated first.
PERFORM A PRIMARY SURVEY OF THE CASUALTY
If the casualty is not responsive, send a soldier for medical help (send soldier to get a combat medic) and continue your evaluation.
PERFORM A PRIMARY SURVEY OF THE CASUALTY
Check the Casualty\'s Airway
If the casualty is responsive, evaluate him for airway obstruction (universal choking sign, difficulty in breathing, etc.). If the casualty has poor or no air exchange, expel the obstruction (IS0824, 2).
If the casualty is not responsive (unconscious), open his airway using the head-tilt/chin-lift or jaw thrust method (IS0824, 3).
PERFORM A PRIMARY SURVEY OF THE CASUALTY
Question:
If you think the casualty has a fractured neck, which method would you use?
Response:
Jaw thrust.
PERFORM A PRIMARY SURVEY OF THE CASUALTY
Check the Casualty\'s Breathing
If a responsive casualty is talking or yelling in pain, his breathing is adequate.
If the casualty is not responsive (unconscious), evaluate his breathing by feeling for breath on your face, looking for the rising and falling of his chest, and listening for sounds of breathing.
If the casualty is not breathing or is having difficulty in breathing, open his airway, expel any airway obstruction, and perform mouth-to-mouth resuscitation (IS0824, 3).
Do not perform mouth-to-mouth (or mouth-to-nose) resuscitation in a chemical environment.
PERFORM A PRIMARY SURVEY OF THE CASUALTY
Check the Casualty\'s Circulation
If the casualty is responsive and breathing adequately, he has a pulse.
If the casualty is unresponsive or not breathing, check his pulse (IS0824, 3). If the casualty has no pulse, seek medical help immediately.
If you are qualified to administer cardiopulmonary resuscitation, you can administer CPR and send a soldier to get medical help.
PERFORM A PRIMARY SURVEY OF THE CASUALTY
Check the Casualty for Bleeding
Look for blood-soaked clothing, spurts of blood, pooling of blood under the body, and other signs of external bleeding.
If a major amputation of a limb is found, apply a tourniquet to the upper arm or thigh and dress the stump (IS0824, 4).
PERFORM A PRIMARY SURVEY OF THE CASUALTY
Question:
If a soldier has had a finger completely cut off, would you apply a tourniquet?
Response:
No. Amputation of part of a hand or part of a foot can be controlled by a pressure dressing.
PERFORM A PRIMARY SURVEY OF THE CASUALTY
If serious bleeding from a wound of the arm or leg is found, apply a field dressing or improvised dressing and bandage to the wound (IS0824, 4). Look for both entry and exit wounds.
Apply manual pressure and, if the limb is not fractured, elevate the wound.
If serious bleeding from a limb is not controlled by the field dressing, apply a pressure dressing (IS0824, 4).
PERFORM A PRIMARY SURVEY OF THE CASUALTY
If serious bleeding from a limb is not controlled by the pressure dressing, apply a tourniquet (IS0824, 4).
If an open chest wound is found, seal the wound with the plastic dressing wrapper or other airtight material, tape the sealing material on three sides to form a flutter valve, and apply a field dressing to the wound (IS0824, 5).
PERFORM A PRIMARY SURVEY OF THE CASUALTY
If an open abdominal wound is found, position the casualty in a flexed-knee position, position any protruding organs on the casualty\'s abdomen, apply a field or improvised dressing over the wound and organs, and secure the dressing (IS0824, 6).
If an open head wound is found, dress the wound (IS0824, 7). If the casualty has a severe head injury, immobilize the casualty\'s head and neck (IS0824, 10).
If the casualty has more than one severe wound, treat the wound loosing the most blood first.
Do not further expose the wound if you are in a chemical environment.
PERFORM A PRIMARY SURVEY OF THE CASUALTY
Treat for Chemical Agent Poisoning, If Appropriate
If the casualty is showing signs and symptoms of exposure to chemical agents (IS0825, 22), the casualty is breathing, and all life-threatening wounds have been treated, administer additional treatment for chemical agent poisoning as needed (IS0825, 22). (NOTE: The casualty has already been masked and, if severe nerve agent poisoning was present, administered three Mark I antidote kits and one CANA.)
PERFORM A PRIMARY SURVEY OF THE CASUALTY
Have the casualty begin self-aid decontamination procedures if he is able (IS0824, 13). If he cannot, have another soldier decontaminate the casualty. Do not stop your evaluation and treatment to decontaminate the casualty at this time.
If the casualty is suffering from severe nerve agent poisoning and 5 minutes have passed since you administered the last Mark I kit and the CANA, take the casualty\'s pulse. If the pulse rate is below 90 beats per minute, administer an atropine injector.
PERFORM A PRIMARY SURVEY OF THE CASUALTY
If the casualty still twitches, showing signs of seizure, you may administer two more CANA injections at about 5 to 10 minute intervals. Actually, time is less important here than the symptoms. Three CANAs are the limit--normally one from the soldier\'s mask carrier and two from your combat lifesaver aid bag.
PERFORM A PRIMARY SURVEY OF THE CASUALTY
Check the Casualty for Shock
Check the casualty for signs and symptoms of shock (clammy and pale skin, severe loss of blood, severe burns, increased breathing rate, mental confusion, etc.).
If hypovolemic shock is present, position the casualty, protect him from the environment, and administer fluids intravenously (IS0824, 8, and IS0825, 17).
Position the casualty on his back with the feet elevated slightly above the level of his heart unless his injury requires a different position.
PERFORM A PRIMARY SURVEY OF THE CASUALTY
If the casualty has a fractured leg, do not elevate the leg until it has been splinted.
Initiate an I.V. if the casualty has suffered severe blood loss or has second or third degree burns on 20 percent or more of his body.
PERFORM A SECONDARY SURVEY OF THE CASUALTY
Check the Casualty for Fractures
Check legs and arms for protruding bone, abnormal limb position, major wounds, bruises, and painful or tender spots.
If a spinal injury is suspected (IS0824, 10), immobilize the casualty\'s neck and back (IS0824, 10).
PERFORM A SECONDARY SURVEY OF THE CASUALTY
If a fracture or a massive wound is present, dress open wounds on the limb (including burns) and then immobilize the limb with a padded splint (IS0824, 9, and IS0825, 20). Secure the splint above and below the fracture site.
Do not try to straighten (align) the broken bone.
Check the casualty\'s circulation before and after applying the cravats. Loosen the cravats and reapply, if needed.
Apply a sling and swath to further immobilize a fractured upper arm, forearm, or wrist (IS0824, 9).
PERFORM A SECONDARY SURVEY OF THE CASUALTY
Check the Casualty for Burns
Look for reddened, blistered, or charred skin, for burned or singed clothing, and for other evidence of burns. Give special attention to burns about the head and neck for possible inhalation burns. Some burns, such as chemical burns, may not be readily seen unless the casualty\'s clothing is removed.
Do not further expose wounds if you are in a chemical environment.
PERFORM A SECONDARY SURVEY OF THE CASUALTY
If the casualty has a chemical burn, remove as much of the chemical as possible before applying a dressing. (NOTE: Keep white phosphorus burns wet to keep the particles away from oxygen and thus igniting, but do not try to remove the particles.)
Apply a dry dressing to burned areas on the trunk and limbs (IS0824, 11).
Do not apply a bandage to burns of the face or genitalia.
PERFORM A SECONDARY SURVEY OF THE CASUALTY
Remove jewelry from a burned limb.
If an electrical current passed through the casualty, locate and dress both the entry and exit wounds.
If second and third degree burns cover 20 percent or more of the skin surface, initiate an intravenous infusion (IS0825, 17).
Check the Casualty for Closed Head Injury (Concussion)
Look for signs and symptoms of a concussion (IS0824, 7).
PERFORM A SECONDARY SURVEY OF THE CASUALTY
Question:
What are some of the signs and symptoms of a concussion?
Response:
Unequal pupils, fluid leaking from the ear or nose, slurred speech, mental confusion, drowsiness, headache, dizziness, loss of memory, loss of consciousness, twitching or convulsions, difficulty in walking (staggering), nausea, and vomiting.
PERFORM A SECONDARY SURVEY OF THE CASUALTY
If a closed head injury is suspected, evacuate the casualty to a medical treatment facility.
If the casualty is having convulsions, support his head and neck and maintain an open airway.
If the casualty has a head injury, monitor the casualty\'s respirations and be prepared to administer mouth-to-mouth resuscitation should it become necessary.
PERFORM A SECONDARY SURVEY OF THE CASUALTY
Check the Casualty for Environmental Injuries
If the casualty has been working in a hot environment, check for signs and symptoms of heat stroke, heat exhaustion, and heat cramps (IS0824, 12).
If the casualty has heat stroke, expose the skin, pour or spray water on him, fan him, and evacuate him as quickly as possible. Continue cooling efforts, such as pouring water over the casualty and fanning him, during evacuation. Have him drink cool water if he can tolerate the water without vomiting.
PERFORM A SECONDARY SURVEY OF THE CASUALTY
If the casualty is suffering from heat cramps or heat exhaustion, move him to a shaded place and cool him off. Have the casualty drink at least one quart of cool water.
All casualties with heat exhaustion or heat stroke should get an intravenous infusion (IS0825, 17). Also, try to get the casualty to drink water.
If the casualty has been exposed to cold or freezing weather, check for signs and symptoms of general hypothermia, frostbite, immersion syndrome, and chilblain (IS0825, 23).
If general hypothermia is present, move the casualty to a protected location and use a heat source (such as another soldier\'s body) to rewarm the casualty. Evacuate the casualty as soon as practical.
PERFORM A SECONDARY SURVEY OF THE CASUALTY
If deep frostbite is found, move the casualty to a warm place, thaw the area, and evacuate the casualty as soon as practical.
Do not thaw frozen feet if the casualty will be required to walk or if the feet will refreeze before reaching the medical treatment facility.
If superficial frostbite or chilblain is found, rewarm and protect the affected area.
If immersion syndrome is found, dry and rewarm the affected area.
PERFORM A SECONDARY SURVEY OF THE CASUALTY
Check the casualty for visual problems resulting from lasers weapons or snow blindness (IS0824, 11, and IS0825, 23).
Protect the casualty from additional injury. Cover the eyes with a dark cloth if the casualty is in pain or if vision loss is severe.
Evacuate the casualty if practical.
PERFORM A SECONDARY SURVEY OF THE CASUALTY
Check the Casualty for Other Wounds/Fractures
Look for minor wounds and fractures. Dress and bandage the wounds as time permits. Splint fractured fingers using the same basic splinting procedures given in IS0824, 9.
Check the Casualty for Combat Stress Reaction
If the casualty appears to be injured but you cannot find any physical injury, look for signs and symptoms of combat stress reaction (IS0825, 24). If combat stress reaction is suspected, take appropriate measures.
MONITOR THE CASUALTY
Monitor the casualty for life-threatening conditions throughout the evaluation process. For example, a casualty who is breathing when you begin your evaluation may suddenly stop breathing. Anytime a life-threatening condition is detected, stop your evaluation and treat the life-threatening condition.
MONITOR THE CASUALTY
Some conditions may require time to properly evaluate. If you apply a field dressing to a bleeding wound on the casualty\'s leg, for example, continue to monitor the injury in case additional measures (pressure dressing or tourniquet) are needed to control bleeding. You can proceed with your evaluation and treatment of the casualty while continuing to monitor the wound for bleeding.
MONITOR THE CASUALTY
If you have administered nerve agent antidote to a severe nerve agent casualty, continue to check the casualty\'s pulse every five minutes. If the casualty\'s pulse rate is below 90 beats per minute, administer an atropine autoinjector (IS0825, 22). Remember, for control of seizures, give another CANA up to the limit of three.
MONITOR THE CASUALTY
If the casualty has not been treated for shock, take measures to prevent shock. The measures to control shock given in 8 of IS0824 (loosen clothing, position the casualty, and protect the casualty from the cold) are also used to prevent shock from occurring.
MONITOR THE CASUALTY
Monitor a heat cramp or heat exhaustion casualty to ensure he continues to drink water without vomiting and his condition does not become more serious. Be prepared to administer mouth-to-mouth resuscitation, increase cooling efforts, initiate an I.V., and evacuate the casualty if his condition worsens.
Be ready to open his airway and administer mouth-to-mouth resuscitation should the need arise. If medical personnel arrive, report your findings.
MONITOR THE CASUALTY
Insert an oropharyngeal airway to keep an unconscious casualty\'s airway open if the airway is needed and is the proper size (IS0825, 21).
Continue to perform any needed procedures, such as keeping white phosphorus burns wet.
If you are treating more than one casualty, continue to monitor the other casualties for life-threatening conditions while administering treatment to a casualty.
Whenever possible, have the casualty evaluated by a combat medic or other medical personnel.
MONITOR THE CASUALTY
Continue to monitor the casualty until you return the casualty to duty, until a medical person (usually a combat medic or member of a medical evacuation team) takes over, or until you must resume your combat duties.
If the casualty requires evacuation, transport him using the best means available (IS0825, 26, and IS0824, s 14 and 15).
MONITOR THE CASUALTY
If you are the leader of a litter team evacuating the casualty, continue to monitor the casualty during the evacuation. Stop and render the appropriate aid if a life-threatening condition arises.
If a medic is not available and a soldier has a minor headache, cold, or hay fever, administer acetaminophen or pseudoephedrine hydrochloride tablets as needed if no contraindications are present (IS0825, 25).
ASSIST THE MEDIC
If the medic requests assistance and your combat duties allow, assist the combat medic in providing care to casualties and evacuating casualties. The medic will provide instructions as needed.
EVALUATE THE CASUALTY
CLOSING As a Combat Lifesaver, you play a vital role in the treatment of the sick and injured on the battlefield. In many instances, you will be the first person to encounter and treat the patient. The care you provide can make the difference between a life saved and a life lost. Stay current in your skills and be prepared to employ them at a moments notice!
Questions